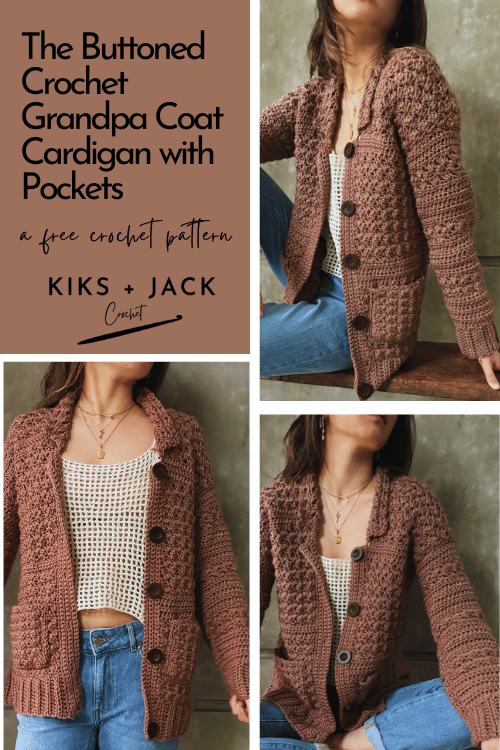
The Buttoned Crochet Grandpa Coat Cardigan with Pockets is a free and easy crochet pattern that is made to measure, size inclusive and designed to be intuitive and beginner friendly.
We have been wanting to design a classic brown cardigan with pockets and brown buttons for a long time. One of those beautiful basics that you can wear all season.
This pattern is free when you access it online through your desktop or mobile device. We rely on ad revenue to meet the costs of running this website along with coffee donations at https://ko-fi.com/kiksandjackcrochet. Thanks for supporting us and allowing us to keep providing free online patterns.

In the winter we wear The Buttoned Crochet Grandpa Coat Cardigan over crocheted sweater tops and layer it under warm jackets and oversized scarves. In spring the plan is to throw it over white T-shirts, jeans and floral dresses.
We used a Weight 4/medium yarn called Schitt’s Creek by Lion Brand Yarns. This premium acrylic yarn is perfect for this design as it gives the crochet cardigan a little structure yet is still so soft. This yarn comes in so many beautiful colours and we are currently working on another sweater in a beige.
Do you love the little collar, large buttons and pockets? We hear, it’s all part of the grandpa dressing trend! However trend or no trend, this is going to be a classic. As with all our made to measure patterns we will show you how to customize these details to your preference.

As a blog dedicated to beginner friendly patterns, we want crocheters to know that the Buttoned Crochet Grandpa Coat Cardigan is a slightly harder pattern than our usual patterns. However we would totally encourage new crocheters to give it a go. The buttons, pockets and stitch changes make the cardigan look more complex but it is actually very simple and we have written the pattern to be detailed and intuitive for beginners.
Recently, a crocheter described our patterns on social media as “not only describing the how to crochet, but the why as well”…. We feel very proud to have received such a great compliment!
Let’s get started on the Buttoned Crochet Grandpa Coat Cardigan!
DESCRIPTION of The Buttoned Crochet Grandpa Coat Cardigan
The Buttoned Crochet Grandpa Coat Cardigan is a casual cardigan with long sleeves and ribbing on the bottom and at the cuffs. It can be worn all season and features a small simple collar and opening. There is a simple stitch change and we add buttons and pockets. The cardigan is suitable for advanced beginners. It is designed to be long and oversized.
The Buttoned Crochet Grandpa Coat Cardigan is a free and easy crochet pattern available as a size inclusive made to measure pattern. It is beginner friendly and uses weight 4/medium/ worsted yarn. This pattern accommodates for different gauges.
CROCHET MEASUREMENTS & SIZES
The pattern instructions for The Buttoned Crochet Grandpa Coat Cardigan are made to measure, based on your required measurements.
Kiks + Jack Crochet will always try to write patterns that are “made to measure” (versus graded sized patterns) so that crocheters can get the wonderful benefits of making a garment that fits perfectly. However we do appreciate taking measurements can be inconvenient for some and have also provided standard measurements for those who wish to use it.
To use this pattern you will need the following measurements and you should write them down for easy reference:
Chest/Bust: Measure around the fullest part of your chest/bust. Do not draw the tape too tightly.
Finished length: Measure from where you would like the cardigan to end up to the top of your shoulder. We wanted our cardigan to hit at our hips.
Arm Length: With arm slightly bent, measure from armpit to wrist (or where you would like the sleeve to end)
Wrist Circumference: Measure from one point on your wrist all around your wrist.
Standard Sizing (For Reference)
If you would like to use standard sizing for the chest/bust – then for XS (S, M , L, XL, 2XL, 3XL, 4XL, 5XL) use approximately 28-30 (32-34, 36-38, 40-42, 44-46, 48-50, 52-54, 56-58, 60-62) inches or 71-76 (81-86, 91-96, 102-107, 112-117, 122-127, 132-137, 142-147, 152-158) centimetres.
If you would like to use standard sizing for arm length – then for XS (S, M , L, XL, 2XL, 3XL, 4XL, 5XL) use approximately 16.5 (17, 17, 17.5, 17.5, 18, 18, 18.5, 18.5) inches or 42 (43, 43, 44.5, 44.5, 45.5, 45.5, 47, 47) centimetres
Note: The Buttoned Crochet Grandpa Coat Cardigan is designed as an oversized fit with significant positive ease.
CROCHET GAUGE
Using a 6mm crochet hook, approximately 14 half double crochets across and approximately 10 rows of half double crochet in 4″ x 4″ (10 cm x 10 cm).
The Buttoned Crochet Grandpa Coat Cardigan pattern can accommodate different gauges however we recommend using a yarn gauge similar to ours.
CROCHET MATERIALS for The Buttoned Crochet Grandpa Coat Cardigan
This section contains product affiliate links. We may receive a small commission (at no extra cost to you) if you make a purchase after clicking on one of these links.
We promise to only recommend products that we love and that we use.
Yarn brand Schitt’s Creek by Lion Brand Yarns. Weight 4/Medium/Worsted. 200g per skein and 372 yards (or 340 m). Colour used is Boho Brown. This yarn is currently available on Amazon.
Approximately 3.2 skeins or 1190 yards (or 1088m) used for our garment (approximately S) with a finished width of 19 inches and a finished length of 25 inches.
Large Buttons: We purchased these 1 inch (approx) brown buttons from Amazon. They are of great quality, come in a number of natural colours and are budget friendly. We used 5 buttons for our version. Our instructions are based on this button size so you may want to purchase buttons of similar width.
6 mm crochet hook (US size 10) and 5 mm hook (US size 8). We use many different crochet hooks and if you are looking for some great budget friendly ergonomic crochet hooks try these from Amazon. It comes in a set and the grip and the shape is amazing for beginner crocheters. However our absolute favourite, slightly more pricey crochet hooks are clover crochet hooks. You can buy then in a set or individually. We started our collection just purchasing the size 4 ,5 and 6.
Measuring Tape. We use a super budget friendly measuring tape. Make sure it has cm and inches (not all patterns are written with both). We are always crocheting on the go so we like our tapes small and compact and we put one in our design area, one in our bag and one in our car. Retractable works best! We use these super cheap mini measuring tapes from Amazon.
Stitch Markers. We use these locking crochet stitch markers from Amazon and these stitch markers that do not lock. They are cheap and colourful.
Blocking Pins. You should buy more pins than you think you need. If you are going to take the time to block don’t skimp on the pins. We like T shaped stainless steel pins that don’t rust when they get wet. We love these blocking T pins from Amazon and the tin means the pins don’t fall out on the floor.
Yarn Needle. Buy blunt needles with large eyes for yarn. We use these Yarn Needles because we like the convenient bottle, they are budget friendly and we get lots of them!
Scissors. We love these thread snippers because they are cheap, we get two of them AND they come with a case (some don’t). Don’t carry these without the case! After you use thread snippers you won’t want to snip with scissors.
Sharp Needle and Matching Thread. To sew your buttons on to your crocheted coat.
CROCHET STITCHES & ABBREVIATIONS
The Buttoned Crochet Grandpa Coat Cardigan pattern uses US terminology.
ch = chain (With one loop on your hook, yarn over and pull through the loop)
sc = single crochet (Insert hook into desired stitch. Yarn over and pull through the stitch. You now have two loops on your hook. Yarn over and pull through all two loops)
hdc = half double crochet (Yarn over and insert hook into desired stitch. Yarn over and pull through the stitch. You now have three loops on your hook. Yarn over and pull through all three loops)
dc = double crochet (Yarn over and insert hook into desired stitch. Yarn over and pull through the stitch. You now have three loops on your hook. Yarn over and pull through the first two loops. You now have two loops on your hook. Yarn over and pull through all two loops)
BLO = back loop only
tch = turning chain
sl st = slip stitch (Insert hook into desired stitch. Yarn over and pull through the stitch and the loop on your hook)
st = stitch
sk = skip stitch
* = repeat the instructions following the * as directed
Note unless stated otherwise turning chains do not count as a stitch if there are 1 or 2 chains and the turning chain does count as a stitch if there are 3 or 4 chains.
SUMMARY of CONSTRUCTION for The Buttoned Crochet Grandpa Coat Cardigan
The Buttoned Crochet Grandpa Coat Cardigan is made by first crocheting a back panel ribbing and then crocheting the main back panel. We will then crochet two front panels, starting with the ribbing and this will make up the front of the cardigan. We will then crochet the sleeve panels starting with the cuff and then crochet the sleeve panel until it reaches the required length. We will seam the two front panels and the back panels at the shoulder and then seam sleeves directly on to the panels.
We show you how to crochet a small collar around the neckline. We will also show you how to crochet edging for your buttons and button holes. Finally we crochet two pockets and sew these on to the cardigan.
PERMISSIONS AND COPYRIGHT for The Buttoned Crochet Grandpa Coat Cardigan
Please do not publish or share The Buttoned Crochet Grandpa Coat Cardigan pattern as your own. You may crochet items to sell using this pattern upon permission by email at [email protected]. Please link back to this post in exchange. Please do NOT use my photos as your own photos.
PATTERN INSTRUCTIONS for The Buttoned Crochet Grandpa Coat Cardigan
Use the larger hook size.
Crochet the Main Back Panel Ribbing
The height of our ribbing is approximately 3 inches. Based on our gauge this is approximately 12 chains. However you can adjust the number of chains if you want to change the height of the ribbing or you are using a yarn with a different gauge.
ch 12
Row 1: hdc in 3rd ch from hook, hdc in each ch across until end. Turn
Row 2: ch2, hdc BLO in each st across, hdc into the entire st on the last st. Turn
Repeat row 2 until the total length of the ribbing is equal to HALF of your “Chest/Bust Measurement” + 3 inches.
Example: Our chest/bust measurement = 32 inches around. Half of 32 inches = 16 inches. We keep repeating row 2 until the total length of the ribbing reaches 19 inches (16 + 3 = 19 inches). Note this design is oversized.
Count the total number of rows.
Example: We counted a total of 40 rows to achieve a length of 19 inches.
It’s a great time to check if you are completely happy with the width of the cardigan before you crochet any further. It may expand a little more when we start crocheting the back panel. Place the ribbing up against you to see if the width (length of ribbing) is right for you. If you would like it to be wider and more oversized, crochet a few more rows. If you would like the ribbing to be tighter and less oversized, then you can frog (unravel) a few rows.
Do not fasten off.
Crochet the Main Back Panel
You will now crochet down the long side of the ribbing that you just crocheted.
To calculate the number of stitches that you will crochet down the long side of the ribbing, calculate as follows:
| Calculation | Kiks + Jack Crochet Example |
| Count the number of rows in your ribbing | We crocheted 40 rows in our ribbing (to achieve 19 inches) |
| Multiply this by 1.5 (round up if necessary) | 40 X 1.5 = 60 stitches |
| Adjust this number upwards to ensure it is a multiple of 3. If the number is already a multiple of 3 then keep it as is. | 60 is a multiple of 3 so we keep this number as is. |
Row 1: Using the working yarn, ch1, sc into the first st, sc across the ribbing the total number of stitches you calculated above. Turn
In K+J example above we will crochet 60 single crochets across the long side ribbing. You may want to divide your ribbing into 4 quarters using stitch markers and ensure you are crocheting approximately 25% of your total stitches in each quarter. This will help ensure you are crocheting evenly across your ribbing.
Row 2: ch2, 2dc in 1st st, *sk next 2st, [1sc, 2dc] in next st, rep from * towards the end of row with 1sc in last st. Turn
Row 3: ch1 (counts as a sc), 2dc in 1st st, *sk next 2dc, [1sc, 2dc] in next st, rep from * towards the end of row with 1sc in top of tch. Turn
Tip: Think of each [1sc, 2dc] as a cluster, and you are crocheting clusters between the clusters from the previous row.
Row 4-18: repeat row 3
Row 19: ch2, hdc into 1st st, hdc across ensuring you have the same number of hdc as your initial number of sc in row 1. Turn. See example below.
In Kiks + Jack Crochet’s example we would crochet 60 hdc across for row 19. We achieved this by crocheting hdc at the start, 3 hdc per cluster and 2hdc at the end. The important thing is to ensure you crochet the same number of stitches as Row 1.
Row 20-21: ch2, hdc into 1st st, hdc across the row. Turn
Repeat row 2 to row 21 in that order, until the back panel (including ribbing) is equal to your “Finished Length Measurement“.
Fasten off.
Crochet the Main Front Panel Ribbing (Make 2)
Use the larger hook size.
You will now crochet 2 panels that will make up the front of your cardigan. The length of each front panel ribbing is calculated as follows:
| Calculation | Kiks+Jack Crochet Example |
| Calculate the number of rows you crocheted in your back panel ribbing | We crocheted a total of 40 rows in our back panel ribbing |
| Multiply by 0.8 and round up to a whole number | 40 rows x 0.8 = 32 rows |
| Divide by 2 and round up to a whole number | 32 rows divided by 2 = 16 rows |
ch 12
Row 1: hdc in 3rd ch from hook, hdc in each ch across until end. Turn
Row 2: ch2, hdc BLO in each st across, hdc into the entire st on the last st. Turn
Repeat row 2 until the total number of rows in your ribbing is equal to the number of rows you calculated above.
K+J example: Based on our measurement, we keep repeating row 2 until the total length of the ribbing is 16 rows
Do not fasten off.
Crochet the Main Front Panel (Make 2)
You will now crochet down the long side of the ribbing.
To calculate the number of stitches you will crochet down the long side of the ribbing, calculate as follows:
| Calculation | Kiks+Jack Crochet Example |
| Count the number of rows in your front panel ribbing | We have 16 rows in our ribbing |
| Multiply this by 1.5 | 16 X 1.5 = 24 |
| Adjust this number upwards to ensure it is a multiple of 3. If the number is already a multiple of 3 then keep it as is. | 24 is a multiple of 3 so we keep this number as is. |
Row 1: Using the working yarn, ch1, sc into the first st, sc across the ribbing the number of stitches you calculated above in total. Turn
In K+J example above we will crochet 24 single crochets across the long side of the ribbing.
Row 2: ch2, 2dc in 1st st, *sk next 2st, [1sc, 2dc] in next st, rep from * towards the end of row with 1sc in top of tch. Turn
Row 3: ch1 (counts as a sc), 2dc in 1st st, *sk next 2dc, [1sc, 2dc] in next st, rep from * towards the end of row with 1sc in top of tch. Turn
Row 4-18: repeat row 3
Row 19: ch2, hdc into 1st st, hdc across ensuring you have the same number of hdc as your initial number of sc. Turn. See example below.
In Kiks + Jack Crochet’s example we would crochet 24 hdc across for row 19. The important thing is to ensure you crochet the same number of stitches as Row 1.
Row 20-21: ch2, hdc into 1st st, hdc across the row. Turn
Repeat row 2 to row 21 in that order, until the front panel (including ribbing) is equal to your “Finished Length Measurement“. We also like to place the front panel over the back panel and double check the lengths are equal.
Fasten off.
Remember to crochet TWO identical front panels with ribbing.
Crochet the Sleeve Panel Ribbing (Make 2)
Use the larger hook size.
ch 12
Row 1: hdc in 3rd ch from hook, hdc in each ch across until end. Turn
Row 2: ch2, hdc BLO in each st across, hdc into the entire st on the last st. Turn
Repeat row 2 until the total length of the ribbing is equal to your “Wrist Circumference Measurement” + 3 inches. Note: we like our sleeves very oversized that reach past our wrists towards our knuckles and sometimes close to the tips of our fingers.
Count the number of rows (we crocheted 18 rows).
Do not fasten off.
Crochet the Main Sleeve Panel (Make 2)
Note that the stitch pattern changes for the sleeve panel.
To calculate the number of stitches you will crochet down the long side of the ribbing, calculate as follows:
| Calculation | Kiks+Jack Crochet Example |
| Count the number of rows in your sleeve panel ribbing | We have 18 rows in our ribbing |
| Multiply this by 2 | 18 x 2 = 36 stitches |
| Adjust this number upwards to ensure it is a multiple of 3. If the number is already a multiple of 3 then keep it as is. | 36 is a multiple of 3. |
Row 1: Using the working yarn, ch1, sc into the first st, sc across the ribbing the number of stitches you calculated above in total. Turn
In K+J example above we will crochet 36 single crochets across the long side of the ribbing. Once again, you may want to divide your ribbing into 4 quarters using stitch markers and ensure you are crocheting approximately 25% of your total stitches in each quarter.
Row 2: ch2, hdc into 1st st, hdc across the row. Turn
Row 3-8: repeat row 2
Row 9: ch2, 2dc in 1st st, *sk next 2st, [1sc, 2dc] in next st, rep from * towards the end of row with 1sc in top of tch. Turn
Row 10: ch1 (counts as a sc), 2dc in 1st st, *sk next 2dc, [1sc, 2dc] in next sc, rep from * towards the end of row with 1sc in top of tch. Turn
Row 11-12: repeat row 10
Row 13: ch2, hdc into 1st st, hdc across ensuring you have the same number of hdc as your initial number of single crochets. Turn. See example below.
In Kiks + Jack Crochet’s example we would crochet 36 hdc across for row 13. The important thing is to ensure you crochet the same number of stitches as Row 1.
Optional Tip: At this point you may want to measure the width of the sleeve panel. If the width is less than the widest part of your arm (typically the bicep circumference) you may want to increase the width in Rows 14, 16 & 18 by adding 2hdc at the start and end of the row. We did not need to do this for our version, however everyone’s body proportions are different.
Row 14-20: ch2, hdc into 1st st, hdc across the row. Turn
Repeat row 9 to row 20 in that order until the length of the sleeve panel (including ribbing) is equal to your “Arm Length to Underarm Measurement“. If you need to widen the width of the sleeve panel again you can do so when you repeat rows 14,16 & 18.
We will show you how to check the sleeve length again under “Assembly” below so that you can ensure you have the perfect fit.
Fasten off.
Make sure you crochet TWO identical sleeve panels with ribbing.
Assembling The Buttoned Crochet Grandpa Coat Cardigan
Kiks + Jack Crochet highly recommends blocking all your panels before assembly. Blocking your panels will set your panels to the shape and size you want and give it a polished look.
We block our panels by pinning all the pieces on to an old yoga mat and manipulating the shape and edges so the front and back panels are similar and the two sleeve panels are similar. We then spray it with water focusing on the edges and ensuring it is well saturated. Do not remove the pins until the panels are completely dry.
Step 1: Seam the Front and Back Panels at the shoulder.
Place one front panel and back panels together lined up at the side and shoulder with the right sides facing together. With a yarn needle, seam the panel together across the shoulders starting from the edge and up to the end of the front panel. Fasten off. Do the same with the second front panel on the other side of the back panel. See the diagram below (for illustrative purposes only).

Step 2: Line up your sleeves at the midway point to the shoulder and seam. Open up the two panels (now seamed at the shoulders) so that the right side is facing the floor and the wrong side is facing upwards. Take one of your crocheted sleeves and fold it in half lengthways. Place a stitch marker at the top of your sleeve at the centre point. With the wrong side of the sleeve facing up, attach this stitch marker to the left edge of the left shoulder seam.
Do the same on the right side with the other sleeve.
Customization Tip: It is a good time to check the length of your sleeve. You can “seam” the sleeve panel with a few locking stitch markers to the main panel. Try it on.
If you would like the sleeve to be longer (eg. some like the length to be almost at the knuckles vs the wrist), you can add a few more rows on to your sleeve. You do this by unknotting your final knot where you fastened off at the end of the sleeve panel, attach matching yarn and crochet a few more rows. Or you can reduce rows if you like your sleeves shorter. You do this by unknotting your final knot where you fastened off and pulling out (frogging) the rows. Make sure you do the exact same on the second sleeve.
When everything is perfect, using a yarn needle and matching yarn, seam the sleeves to the main panels (wrong side facing up). See the diagram below (for illustrative purposes only).

Step 3: Seam the sides of the sweater and the bottom of the sleeve together. Fold the panels and sleeve panels at the seamed shoulders so that your cardigan is facing wrong side out. With a yarn needle and matching yarn, seam the sides of the two panels together up to the armpit and along the bottom of the sleeve.
Fasten off.
Crochet the Neckline and Collar
Use the smaller hook size.
Attach a matching yarn at the bottom of your front panel. Start with the side that works best for you.
ch1, sc around the entire front opening from one end at the bottom all around the neckline to the other end. Try to crochet evenly around the neckline. This is more important than the exact number of stitches around. Fasten off.
We will now crochet the small collar around the neckline.
Step 1: Put the cardigan on and take a look at how the front opening falls. Work out where you would like the buttons to start and where you would like the collar to fall. Here is another look at our version.

You can use a locking stitch marker as your “top button” and see what feels comfortable for you upon closure and general fit. Note that you will be crocheting extra width for the buttons and button holes.
For the Kiks + Jack version, we measured approximately 7 inches from the shoulder seam to the bottom of the collar (length of collar) and 18 inches from the bottom of the collar (or approximately where the top button will be) to the bottom of the cardigan.
Step 2: Measure your desired collar length from the shoulder join, down the left side front panel and place a locking stitch marker at the neckline. Do the same on the right side front panel. In our example this would be 7 inches.
Step 3: Attach a yarn to one side where one of your stitch markers are placed.
Row 1: ch2, 2dc in 1st st, *sk next 2st, [1sc, 2dc] in next st, rep from * around the top of the neckline towards the second stitch marker on the other side. You should end with a sc as close to the second stitch marker as possible. Turn.
Row 2: ch1 (counts as a sc), 2dc in 1st st, *sk next 2dc, [1sc, 2dc] in next sc, rep from * towards the end of row until you are 3 st left, sk next 2dc, 1sc in top of tch. Turn
Row 3-5: repeat row 2
Take a look at the width of the collar. If you would like it slightly wider you can repeat another row 2.
When folded back Kiks + Jack’s collar width is approximately 2.5 inches.
Step 4: We suggest you wet block the collar (at some stage) to give it the shape and to keep it folded back.
Crochet the Button Holes
Use the smaller hook size.
We will crochet the button holes and the edge where you will sew the buttons.
Step 1: Work out which side you want buttons and which side you want button holes. Kiks + Jack Crochet wants buttons on the left side and button holes on the right side when the cardigan is worn.
Let’s start with crocheting the buttons side. Attach a yarn to the bottom of the side that you want buttons (we would attach it on the left side).
Row 1: ch2, sc into second st, sc up to just below the collar. Turn
Row 2 – 5: repeat row 1
After row 5, our button edging is approximately 1.5 inches. This was a sufficient width to fit our brown buttons and give us closure after we crochet a similar width on the other side. You may need to crochet more or less rows to suit the width of your buttons and closure.
Fasten off.
Step 2: Identify the number of buttons you would like to use. Kiks + Jack Crochet wanted 5 buttons. Place one button at the top and one button at the bottom. Using a measuring tape, place your remaining buttons evenly between the two. Using locking stitch markers, mark the spots for each button so when you remove the buttons you now have stitch markers indicating where the buttons should be.
Step 3: Crochet the other side – the button hole side. Attach a yarn to the bottom of the other side (we would attach on the right side).
Row 1: ch2, sc into 2nd st, sc up to just below the collar (make sure it is the same distance as the button edging on the other side). Turn
Row 2: repeat row 1
Using a measuring tape and stitch markers, mark out where the button holes should be. They should directly match the stitch markers on the other side that are marking the buttons.
Row 3 (the button hole row): ch2, sc into 2nd st, sc into every st except where you need to make a button hole. When you need to make a button hole you ch2, sk2, then continue to sc in every stitch until you reach the next button hole where once again you ch2, sk2. Turn
Tip: Based on our gauge and the size of our buttons, a chain 2 (then skip 2) was the appropriate button hole size so that the button wasn’t too tight or too loose going through the hole. After you have created one button hole, test it out. For example, you may find a chain 1 (then skip 1) is a better fit for your type of button.
Row 4: ch2, sc into 2nd st, sc into every st. When you get to a button hole space, you are crocheting into the space. Turn
In our version we crochet 2sc into every button hole space.
Row 5: ch2, sc into 2nd st until the end. Turn
Fasten off.
Using a sewing needle and matching sewing thread, sew your buttons on the button side where you have placed stitch markers.
Crochet the Pockets
Use the larger hook size.
Chain and count the desired length of the pocket. Make sure the chain is a multiple of 3.
Kiks + Jack crocheted 18 chains to give us a length of approximately 5 inches.
Row 1: ch2, 2dc in 3rd ch from hook, *sk next 2st, [1sc, 2dc] in next st, rep from * towards the end of row with 1sc in top of tch. Turn
Row 2: ch1 (counts as a sc), 2dc in 1st st, *sk next 2dc, [1sc, 2dc] in next sc, rep from * towards the end of row with 1sc in top of tch. Turn
Repeat row 2 until the pocket reaches the desired length.
Kiks + Jack crocheted row 2 until the pocket is equal to approximately 5 inches.
Do not fasten off. We will now crochet sc around the sides and bottom of the pocket. We did not single crochet over the top of the pocket as we liked the design.
ch2, turn, sc into the next st, sc around the side, bottom and other side of the pocket. At the corners, sc into the st, ch1, sc into the same st.
Fasten off.
Crochet two identical pockets.
Using a yarn needle and matching yarn, sew the pockets on to the cardigan making sure the pocket is straight and leaving the top open.
Fasten off.
Finish & Celebrate The Buttoned Crochet Grandpa Coat Cardigan
Weave in all your ends.
Congratulations you have finished The Buttoned Crochet Grandpa Coat Cardigan and we hope you enjoyed this free crochet pattern.
We love and live off coffee. If you would like to buy us a coffee you can at: https://ko-fi.com/kiksandjackcrochet. Thank you for supporting us.
It would be amazing to see a photo of your completed work on instagram. Tag us @kiksandjackcrochet.


2 thought on “Buttoned Crochet Grandpa Coat Cardigan with Pockets Free Pattern”
Comments are closed.