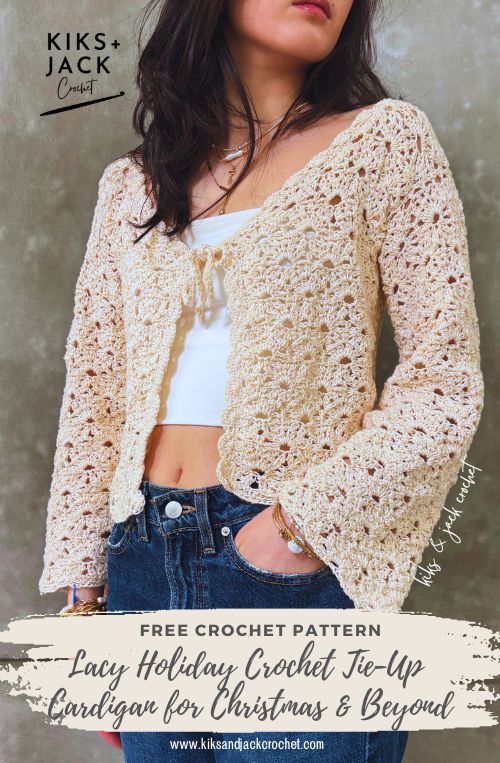
The Lacy Holiday Crochet Tie-Up Cardigan is our perfect festive layer for the Christmas holiday season. We love the delicate lacy stitch and lightweight fabric. Its a great first layer and still feels light and comfortable when we stand around in the heated indoors. We selected a yarn with just a hint of gold sparkle giving it that subtle festive feel without being overtly Christmas-y – as a result we plan to wear it throughout the year.
**Update: We have finished and uploaded the video tutorial showing how to crochet this gorgeous stitch and the shaping around the neckline on the front panels. Scroll down to the “Pattern Instructions” section, and you can see we have embedded the video. It will give you a tutorial on rows 1 – 7 and then part 2 will show how to shape at the neckline. This video complements the full written pattern below.
Use the interactive table of contents below to help you navigate through this blog and we hope you love this beautiful made to measure, size inclusive and free crochet pattern for The Lacy Holiday Crochet Tie-Up Cardigan.

Before we started this blog, we would crochet our Christmas holiday sweater late November and sometimes even early December. We would have it finished just in time to wear it twice – once to a pre Christmas party and on Christmas day itself. Our color of choice would typically be a solid red, because it was festive enough for the holidays, but would be brought back out for Lunar Holidays, Valentines and any other evening we wanted to wear red.
Since we started designing for this blog, we realized pretty quickly that to be fair to our Kiks + Jack community, we had to get these festive patterns out by no later than October (even now we feel we are running a little late with this one). The great thing about The Lacy Holiday Crochet Tie-Up Cardigan, is that we didn’t crochet it in red. Instead we used a gorgeous cotton yarn with stunning sparkly gold threads through it. It’s really subtle so hopefully you can see it on the photos, but its definitely there!
Please support us: We are trying to keep all our crochet patterns free for everyone, when you access them online. We meet the costs of running this website through coffee donations at https://ko-fi.com/kiksandjackcrochet and ad revenue. When you buy us a cup of coffee, you buy us a cup of motivation. Thank you for keeping us motivated and inspired every day to keep designing free crochet patterns for you.
The great thing is we know we are going to wear The Lacy Holiday Crochet Tie-Up Cardigan past the holiday season. Anything at night and it’s subtle enough that we would wear it in the day too. So if you are reading this blog and its close to Christmas or even past Christmas, don’t let that stop you because we are confident this one is truly an “all season” cardigan.
Check out some of our previous Christmas crocheted tops and sweaters:
2023: The Holiday Lace and Mesh Crochet Top
2023: The Fast Easy Done in a Day Scarf
2024: Happy Holidays Easy Red Crochet Cardigan
2024: Quick & Easy Basic Crochet Scarf
We have styled The Lacy Holiday Crochet Tie-Up Cardigan over our favorite wear – jeans and a white top/tee – but it would look equally gorgeous over a festive dress or long black pants and some cute heels. We love this so much, we are crocheting another one in a dark chocolate brown! It’s going to look amazing over a crisp white tee!
Let’s get you started on The Lacy Holiday Crochet Tie-Up Cardigan so you have it ready for your next event!
Also please support us by following us on social media – it really does help us out. Simply click on the icons below and we will keep you up to date on new free pattern releases. Tag us your version of The Lacy Holiday Crochet Tie-Up Cardigan so that we can add your work to our stories and share it with our followers too!
DESCRIPTION of The Lacy Holiday Crochet Tie-Up Cardigan
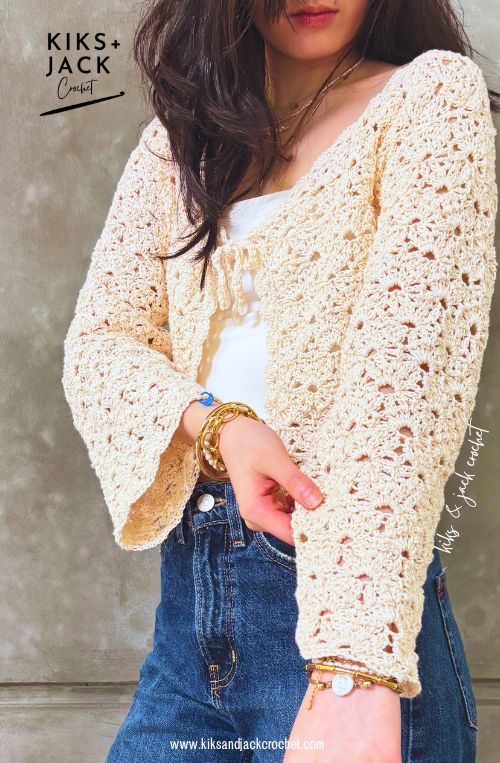
The Lacy Holiday Crochet Tie-Up Cardigan is a beautiful textured and lacy cardigan that is easy and beginner friendly. It does not feature any buttons, pockets or collars and incorporates a gorgeous flower stitch. The cardigan is designed to be worn loose and oversized and is best crocheted in a lighter weight yarn. The Lacy Holiday Crochet Tie-Up Cardigan is finished with a cute clustered trim around the opening and an easy but elegant tie string at the front.
The Lacy Holiday Crochet Tie-Up Cardigan is a free and easy crochet pattern available as a size inclusive made to measure pattern. It is a beginner friendly crochet pattern and we used a weight 3 yarn with shimmery gold threads throughout it. The Lacy Holiday Crochet Tie-Up Cardigan pattern can accommodate for different gauges however we recommend you use a gauge similar to ours.
CROCHET MEASUREMENTS & SIZES
Like many of our crochet designs, the Lacy Holiday Crochet Tie-Up Cardigan is made to be tailored to your own measurements, ensuring a fit that’s uniquely yours. At Kiks + Jack Crochet, we believe that the time and care you put into creating your own clothes should result in pieces that fit beautifully. Rather than giving fixed stitch counts for standard sizes, we guide you through crafting a custom-fit cardigan based on your personal measurements and your own gauge ie. you don’t need to match our gauge exactly.
Below, we’ve outlined all the measurements you’ll need for The Lacy Holiday Crochet Tie-Up Cardigan, along with tips on how to take them accurately. Keep a notebook handy as you work through the pattern, and refer back to your recorded measurements as you go. We will also provide example calculations using our measurements, but remember to adjust each step for your own body and gauge. A standard size chart is included further down for convenience if you find taking measurements difficult.
Gather all the measurements listed below and write them down for easy reference. Having them nearby will make following the pattern smoother and ensure a perfect fit every time:
Chest/Bust: Measure around the fullest part of your chest/bust. Do not draw the tape too tightly.
Finished length: Measure from where you would like the cardigan to end, up to the top of your shoulder.
Armhole Depth Measurement: Measure from the top outside edge of the shoulder down to the armpit. You may want to check that this measurement – when doubled – is as big as your upper arm circumference (around your bicep). Typically it is, however every body shape is different. If your upper arm circumference is larger, take this measurement instead.
Length to Armpit Measurement: Measure from where you would like the cardigan to end up to your armpit.
Arm Length: With arm slightly bent, measure from armpit to wrist (or where you would like the sleeve to end)
Wrist Circumference: Measure from one point on your wrist all around your wrist.
Standard Sizing (For Reference) for The Lacy Holiday Crochet Tie-Up Cardigan
If you would like to use standard sizing for the chest/bust – then for XS (S, M , L, XL, 2XL, 3XL, 4XL, 5XL) use approximately 28-30 (32-34, 36-38, 40-42, 44-46, 48-50, 52-54, 56-58, 60-62) inches or 71-76 (81-86, 91-96, 102-107, 112-117, 122-127, 132-137, 142-147, 152-158) centimetres.
If you would like to use standard sizing for arm length – then for XS (S, M , L, XL, 2XL, 3XL, 4XL, 5XL) use approximately 16.5 (17, 17, 17.5, 17.5, 18, 18, 18.5, 18.5) inches or 42 (43, 43, 44.5, 44.5, 45.5, 45.5, 47, 47) centimetres
If you would like to use standard sizing for armhole depth – then use approximately 6-6.5 (6.5-7, 7-7.5, 7.5-8, 8-8.5, 8.5-9, 9-9.5, 9.5-10, 10-10.5) inches or 15.5-16.5 (16.5-17.5, 17.5-19, 19-20.5, 20.5-21.5, 21.5-23, 23-24, 24-25.5, 25.5-26.5) centimetres
Note: The Lacy Holiday Crochet Tie-Up Cardigan is designed as an oversized fit with significant positive ease.
CROCHET GAUGE
The Lacy Holiday Crochet Tie-Up Cardigan pattern is made to measure and can accommodate for different crochet gauges. You do not need to swatch and match to our gauge however we strongly suggest for this pattern you use a weight 3 yarn and a 4mm hook so that your shaping around the neckline is similar to ours.
CROCHET MATERIALS for The Lacy Holiday Crochet Tie-Up Cardigan
This section contains product affiliate links. We may receive a small commission (at no extra cost to you) if you make a purchase after clicking on one of these links.
Kiks + Jack Crochet promises to only recommend products that we love and that we use. Thank you for supporting us.
Yarn Brand: 24/7 Cotton DK Sparkle Yarn by Lion Brand Yarn. Weight 3/DK/Light Worsted. 100g per skein and 219 yards (or 200 m). We used the colour Star.
Kiks + Jack Crochet’s version of The Lacy Holiday Crochet Tie-Up Cardigan has a finished width of approximately 17 inches and a finished length of 18 inches. We used approximately 3.9 skeins in total, or 854 yards (or 780 m).
Other yarns we would love to try out for The Lacy Holiday Crochet Tie-Up Cardigan include:
Acacia by Hobbii Yarn Weight 3/DK/Light Worsted
Softee Cotton by Bernat. Weight 3/DK/Light Worsted.
Coboo by Lion Brand Yarn. Weight 3/DK/ Light Worsted
Crochet Hook (we used a 4mm and a 3.5mm). We use many different crochet hooks and if you are looking for some great budget friendly ergonomic crochet hooks try these from Amazon. It comes in a set and the grip and the shape is amazing for beginner crocheters. We also love the slightly more pricey crochet hooks from Clover Crochet Hooks and the beautiful Furls Crochet Hooks (these are so stunning, we just love looking at them!)
Yarn Winder!!! (Our new LOVE). We have held off on a yarn winder for a long time. We love the idea of crochet being simple with just a hook and some yarn. However we decided to get this yarn winder, because it was affordable and we weren’t sure about investing in a super fancy one yet. We love it because it breathes life back into scrappy yarn lying around that looks messy. It’s simple to use and is holding up really well for us.
Measuring Tape. We use a super budget friendly measuring tape. Make sure it has cm and inches (not all patterns are written with both). We are always crocheting on the go so we like our tapes small and compact and we put one in our design area, one in our bag and one in our car. Retractable works best! We use these super cheap mini measuring tapes from Amazon
Stitch Markers. We use these locking crochet stitch markers from Amazon and these stitch markers that do not lock. They are cheap and colourful.
Blocking Pins. You should buy more pins than you think you need. If you are going to take the time to block don’t skimp on the pins. We like T shaped stainless steel pins that don’t rust when they get wet. We love these blocking T pins from Amazon and the tin means the pins don’t fall out on the floor.
Yarn Needle. Buy blunt needles with large eyes for yarn. We use these Yarn Needles because we like the convenient bottle, they are budget friendly and we get lots of them!
Scissors. We love these thread snippers because they are cheap, we get two of them AND they come with a case (some don’t). Don’t carry these without the case! After you use thread snippers you won’t want to snip with scissors.
CROCHET STITCHES & ABBREVIATIONS
ch = chain (With one loop on your hook, yarn over and pull through the loop)
sc = single crochet (Insert hook into desired stitch. Yarn over and pull through the stitch. You now have two loops on your hook. Yarn over and pull through all two loops)
dc = double crochet (Yarn over and insert hook into desired stitch. Yarn over and pull through the stitch. You now have three loops on your hook. Yarn over and pull through the first two loops. You now have two loops on your hook. Yarn over and pull through all two loops)
dc2tog = double crochet 2 together (Yarn over and insert hook into desired stitch. Yarn over and pull through the stitch/space. You now have three loops on your hook. Yarn over and pull through the first two loops. You now have two loops on your hook. Yarn over and insert hook into desired stitch/space, yarn over and pull through the stitch. You now have four loops on your hook. Yarn over and pull through the first two loops. You now have three loops on your hook. Yarn over and pull through all three loops)
ch-sp = chain space (eg. crochet into the space and not the stitch)
tch = turning chain
sl st = slip stitch (Insert hook into desired stitch. Yarn over and pull through the stitch and the loop on your hook)
st = stitch
sk = skip stitch
* = repeat the instructions following the * as directed
Note unless stated otherwise turning chains do not count as a stitch if there are 1 or 2 chains and the turning chain does count as a stitch if there are 3 or 4 chains.
SUMMARY of CONSTRUCTION for The Lacy Holiday Crochet Tie-Up Cardigan
The Lacy Holiday Crochet Tie-Up Cardigan starts with crocheting the main back panel. Next, we’ll create two front panels with gentle shaping to form the front of the cardigan.
After that, we move on to the sleeves. Each sleeve panel is crocheted wide enough to comfortably fit over the fullest part of your arm, and we crochet until it reaches the desired length. Once all panels are complete, the front panels are joined to the back panel at the shoulders, and the sleeves are seamed directly onto the body.
To finish The Lacy Holiday Crochet Tie-Up Cardigan, a contrasting edge is added along the neckline for a polished look, and a small tie-up is crocheted to secure the cardigan at the front.
PERMISSIONS AND COPYRIGHT for The Lacy Holiday Crochet Tie-Up Cardigan
You may not publish or share any pattern on this website www.kiksandjackcrochet as your own including this pattern The Lacy Holiday Crochet Tie-Up Cardigan. Except as permitted by the copyright law applicable to you, you may not reproduce or communicate any of the content on this website, including files downloadable from this website, without the permission of the copyright owner, Kiks + Jack Crochet.
You may not use any Kiks and Jack Crochet photo as your own photo.
You may crochet items to sell using The Lacy Holiday Crochet Tie-Up Cardigan pattern upon permission by email at [email protected]. Please link back to this post in exchange.
CROCHET PATTER INSTRUCTIONS for The Lacy Holiday Crochet Tie-Up Cardigan
Note this pattern is designed for a minimum bust size of approximately 32 inches and up.
Crochet the Main Back Panel
Calculate the length of your foundation chain as follows:
| Halve your “Chest/Bust Measurement“ | Our chest/bust measurement = 32 inches around Half our chest/bust measurement = 32/2 = 16 inches |
| Add additional 1-3 inches for positive ease. Important Note: This can be a “constricting stitch” that can reduce your width. Add about 1 extra inch to your desired width to compensate. For example if you want a more oversized cardigan you can add 2 inches plus 1 more inch to compensate for the tight stitch (we added 1 +1). Check your width as you go (we tell you when to check below) as the constriction will vary depending on your gauge and yarn. | 16 + (1+1) = 18 inches |
Chain a length as calculated above counting the number of chains at the same time. Do not pull the chain too tight when you measure it.
Make sure the number of chains ends on a multiple of 11. If not, increase the number of chains so that you finish on a multiple of 11.
Add 3 more chains.
For example Kiks + Jack crocheted 86 chains to reach a total length of 18 inches as per our calculation. However 86 is not a multiple of 11 (it does not divide into 11 evenly). Therefore we increase the number of chains to a total of 88 so that it is a multiple of 11. We then crocheted an additional 3 more chains for a total of 91 chains.
🎥 Video tutorial — stitch only
If you would like to watch the stitch row-by-row, use the embedded video below (rows 1–7). The full written pattern and detailed row instructions are listed underneath, and you can jump to any row using the timestamps in the video. Feel free to stop at Part 2: Shaping for the neckline, and we tell you when to re-visit this in the written pattern below
Scroll down for the full written pattern and detailed row instructions.
Row 1: 1sc into 2nd ch from hook, ch1, sk st, 1sc in next st, *ch3, sk 3st, 1sc in next st, ch3, sk 3st, 1sc in next st, ch2, sk 2st, 1sc in next st, rep from * until the last 2st, ch1, sk st, 1sc in last st. Turn
The next row uses the dc2tog stitch – you will be crocheting this a lot. It’s up in the “Crochet Stitches” section but here it is again for your convenience:
dc2tog = double crochet 2 together (Yarn over and insert hook into desired stitch. Yarn over and pull through the stitch/space. You now have three loops on your hook. Yarn over and pull through the first two loops. You now have two loops on your hook. Yarn over and insert hook into desired stitch/space, yarn over and pull through the stitch. You now have four loops on your hook. Yarn over and pull through the first two loops. You now have three loops on your hook. Yarn over and pull through all three loops)
Row 2: ch3, [dc2tog, ch2, dc2tog] in 1st ch sp, ch1, sk next sc, 1sc in next sc, *ch1, sk ch-3 sp, dc2tog in next ch-2 sp, [ch2, dc2tog] in same ch-2 sp 3 more times (it should now look like 4 x dc2tog petals), ch1, sk ch-3 sp, 1sc in next sc, rep from * ending with a ch1, sk ch-3 sp, [dc2tog, ch2, dc2tog] in last ch-sp (it should look like a “half flower” with only 2 petals), 1dc in last sc. Turn
Row 3: ch1, 1sc in 1st st, *ch3, 1dc2tog in top of each next 4 dc2tog, ch3, sc in next ch-2sp, rep from * to end of row, ending with a ch3, sc in top of tch. Turn
Row 4: ch1, sc in 1st st, *ch3, sc in top of next dc2tog, ch2, sk next 2 dc2tog, sc in top of next dc2tog, ch3, sc in next sc, rep from * to end, ending with a ch3, sc in top of tch. Turn
Row 5: ch1, sc in 1st sc, *ch1, sk ch-3 sp, dc2tog in next ch-2sp, [ch2, dc2tog] in same ch-2 sp 3 more times (it should look like 4 petals sitting above the 4 petals below), ch1, sk ch-3 sp, sc in next sc, rep from * to end, ending with a ch1, sc in top of tch. Turn
Row 6: ch3, 1dc2tog in top of each next 2 dc2tog, ch3, sc in next ch-2sp, ch3, *dc2tog in top of each next 4 dc2tog, ch3, sc in next ch-2sp, ch3, rep from * to last 2 dc2tog, 1dc2tog in top of each next 2 dc2tog, dc in last sc. Turn
Important Note: Before continuing, check that the width of your top matches your earlier calculation and hold it against yourself to ensure you like the fit. Yarn stretch and personal preference can change how it feels, so this quick check is helpful. Keep in mind that the flower stitch can be restrictive, and your sweater may contract depending on your gauge. If you need to adjust the width, restart by increasing or decreasing the foundation chain length – just remember to follow the correct stitch multiple.
Row 7: ch1, sc in 1st st, ch1, sk 1 dc2tog, sc in next dc2tog, ch3, sc in next sc, ch3, *sc in top of next dc2tog, ch2, sk 2 dc2tog, sc in top of next dc2tog, ch3, sc in next sc, ch3, rep from * to last 2dc2tog, sc in next dc2tog, ch1, sk 1 dc2tog, sc in top of tch. Turn.
Repeat rows 2 – 7 until your top reaches the “Finished Length Measurement“.
Fasten off.
Crochet the Front Panel (Make 2)
You will now crochet 2 panels that will make up the front of your cardigan.
Let’s calculate the initial foundation chain for the front panel.
| Calculation | Kiks + Jack Crochet Example |
| How many total chains did you crochet in your initial foundation chain (multiple of 11) for the back panel without the additional 3 chains? | We crocheted 88 chains. |
| Divide this number by 2 | 88/2 = 44 chains |
| Round up to the nearest 11 or keep as is if it is already a multiple of 11. | 44 chains. |
| Add 3 more chains | 44 + 3 = 47 chains |
Chain a length with the same number of chains as calculated above. Try to crochet with the same tension as you used for the back panel.
Row 1: 1sc into 2nd ch from hook, ch1, sk st, 1sc in next st, *ch3, sk 3st, 1sc in next st, ch3, sk 3st, 1sc in next st, ch2, sk 2st, 1sc in next st, rep from * until the last 2st, ch1, sk st, 1sc in last st. Turn
Row 2: ch3, [dc2tog, ch2, dc2tog] in 1st ch sp, ch1, sk next sc, 1sc in next sc, *ch1, sk ch-3 sp, dc2tog in next ch-2 sp, [ch2, dc2tog] in same ch-2 sp 3 more times (it should now look like 4 x dc2tog petals), ch1, sk next sc, 1sc in next sc, rep from * ending with a ch1, sk ch-3 sp, [dc2tog, ch2, dc2tog] in last ch-sp (it should look like a “half flower” with only 2 petals), 1dc in last sc. Turn
Row 3: ch1, 1sc in 1st st, *ch3, 1dc2tog in top of each next 4 dc2tog, ch3, sc in next ch-2sp, rep from * to end of row, ending with a ch3, sc in top of tch. Turn
Row 4: ch1, sc in 1st st, *ch3, sc in top of next dc2tog, ch2, sk next 2 dc2tog, sc in top of next dc2tog, ch3, sc in next sc, rep from * to end, ending with a ch3, sc in top of tch. Turn
Row 5: ch1, sc in 1st sc, *ch1, sk ch-3 sp, dc2tog in next ch-2sp, [ch2, dc2tog] in same ch-2 sp 3 more times (it should look like 4 petals sitting above the 4 petals below), ch1, sk next sc, sc in next sc, rep from * to end, ending with a ch1, sc in top of tch. Turn
Row 6: ch3, 1dc2tog in top of each next 2 dc2tog, ch3, sc in next ch-2sp, ch3, *dc2tog in top of each next 4 dc2tog, ch3, sc in next ch-2sp, ch3, rep from * to last 2 dc2tog, 1dc2tog in top of each next 2 dc2tog, dc in last sc. Turn
Row 7: ch1, sc in 1st st, ch1, sk 1 dc2tog, sc in next dc2tog, ch3, sc in next sc, ch3, *sc in top of next dc2tog, ch2, sk 2 dc2tog, sc in top of next dc2tog, ch3, sc in next sc, ch3, rep from * to last 2dc2tog, sc in next dc2tog, ch1, sk 1 dc2tog, sc in top of tch. Turn.
Repeat rows 2 – 7 until your top reaches approximately the “Length to Armpit Measurement” and end on a row 6.
Do not fasten off. We will now shape gently for the neckline.
Shape Front Panel for Neckline
Shaping on this stitch can be a bit tricky, so we have written the instructions based on you having just finished row 6 and you will be starting a row 7.
Place the front panel in front of you so that the working yarn is on the left hand side. Place a locking stitch marker at the top right hand side. This stitch marker represents the centre of your cardigan and we assume your working yarn is at the edge of your cardigan.
We are going to use the Shaping Rows A – H below to create some space for the neckline.
Pick up the working yarn on the edge and you are working towards the centre represented by your stitch marker.
🎥 Video tutorial — shaping for the neckline
Want to watch a video on the neckline shaping? Head back up to the video and jump to 35:13 to watch Part 2: How to Shape the Front Panel for the Neckline.
Shaping Row A (heading towards the centre) ch1, sc in 1st st, ch1, sk 1 dc2tog, sc in next dc2tog, ch3, sc in next sc, ch3, *sc in top of next dc2tog, ch2, sk 2 dc2tog, sc in top of next dc2tog, ch3, sc in next sc, ch3, rep from * to last sc, sc in this sc and then stop (there should be 2 dc2tog petals left). Turn
Shaping Row B (heading to edge): ch1, sc in 1st sc, *ch1, sk ch-3 sp, dc2tog in next ch-2sp, [ch2, dc2tog] in same ch-2 sp 3 more times, ch1, sk next sc, sc in next sc, repeat at * ending with a ch1, sk ch-3 sp, [dc2tog, ch2, dc2tog] in last ch-sp, 1dc in last sc. Turn
Shaping Row C (heading towards centre): ch1, 1sc in 1st st, *ch3, 1dc2tog in top of each next 4 dc2tog, ch3, sc in next ch-2sp, rep from * to end of row, ending with a ch3, sc in ch-2 sp and stop (there should be 2 x dc2tog petals left). Turn
Shaping Row D (heading to edge): ch1, sc in 1st st, *ch3, sc in top of next dc2tog, ch2, sk next 2 dc2tog, sc in top of next dc2tog, ch3, sc in next sc, rep from * to end, ending with a ch3, sc in top of tch. Turn
Shaping Row E (heading to centre): ch1, sc in 1st sc, *ch1, sk ch-3 sp, dc2tog in next ch-2sp, [ch2, dc2tog] in same ch-2 sp 3 more times, ch1, sk next sc, sc in next sc, rep from * until you reach the last ch-2 sp, [dc2tog, ch2, dc2tog] in ch-2 sp, dc in next sc and stop. Turn. (Tip: ie where you would typically crochet 4 petals in to the ch-2 sp you are only crocheting 2 petals, then finish with a dc in next sc).
Shaping Row F (heading to edge): ch1, 1sc in 1st st, ch3, *dc2tog in top of each next 4 dc2tog, ch3, sc in next ch-2sp, ch3, rep from * to last 2 dc2tog, 1dc2tog in top of each next 2 dc2tog, dc in last sc. Turn
Shaping Row G (heading towards the centre): ch1, sc in 1st st, ch1, sk 1 dc2tog, sc in next dc2tog, ch3, sc in next sc, ch3, *sc in top of next dc2tog, ch2, sk 2 dc2tog, sc in top of next dc2tog, ch3, sc in next sc, ch3, rep from * to last 2dc2tog, sc in this last dc2tog and stop. Turn.
Shaping Row H (heading towards the edge): ch3, [dc2tog, ch2, dc2tog] in 1st ch-2 sp, ch1, sk next sc, 1sc in next sc, *ch1, sk ch-3 sp, dc2tog in next ch-2 sp, [ch2, dc2tog] in same ch-2 sp 3 more times, ch1, sk next sc, 1sc in next sc, rep from * ending with a ch1, sk ch-3 sp, [dc2tog, ch2, dc2tog] in last ch-sp, 1dc in last sc. Turn
At this point we will stop shaping. Follow regular Rows 3-7 below (we have copied it again for your convenience). You don’t need to complete all the rows ie. whenever you reach your “Finished Length Measurement” you can stop and fasten off. If you reach Row 7 below and want it longer, you can return back to crocheting regular Row 2 and repeat.
Regular Row 3: ch1, 1sc in 1st st, *ch3, 1dc2tog in top of each next 4 dc2tog, ch3, sc in next ch-2sp, rep from * to end of row, ending with a ch3, sc in top of tch. Turn
Regular Row 4: ch1, sc in 1st st, *ch3, sc in top of next dc2tog, ch2, sk next 2 dc2tog, sc in top of next dc2tog, ch3, sc in next sc, rep from * to end, ending with a ch3, sc in top of tch. Turn
Regular Row 5: ch1, sc in 1st sc, *ch1, sk ch-3 sp, dc2tog in next ch-2sp, [ch2, dc2tog] in same ch-2 sp 3 more times, ch1, sk next sc, sc in next sc, rep from * to end, ending with a ch1, sc in top of tch. Turn
Regular Row 6: ch3, 1dc2tog in top of each next 2 dc2tog, ch3, sc in next ch-2sp, ch3, *dc2tog in top of each next 4 dc2tog, ch3, sc in next ch-2sp, ch3, rep from * to last 2 dc2tog, 1dc2tog in top of each next 2 dc2tog, dc in last sc. Turn
Regular Row 7: ch1, sc in 1st st, ch1, sk 1 dc2tog, sc in next dc2tog, ch3, sc in next sc, ch3, *sc in top of next dc2tog, ch2, sk 2 dc2tog, sc in top of next dc2tog, ch3, sc in next sc, ch3, rep from * to last 2dc2tog, sc in next dc2tog, ch1, sk 1 dc2tog, sc in top of tch. Turn.
If you need to crochet a few more rows to reach your desired length you can crochet Regular Row 2 below and then go back to Regular Rows 3-7 until you reach your desired length.
Regular Row 2: ch3, [dc2tog, ch2, dc2tog] in 1st ch sp, ch1, sk next sc, 1sc in next sc, *ch1, sk ch-3 sp, dc2tog in next ch-2 sp, [ch2, dc2tog] in same ch-2 sp 3 more times, ch1, sk next sc, 1sc in next sc, rep from * ending with a ch1, sk ch-3 sp, [dc2tog, ch2, dc2tog] in last ch-sp, 1dc in last sc. Turn
Kiks + Jack’s Version: We crocheted regular rows 3-7 and then regular row 2 and stopped, then fastened off.
Remember you need to make two of these front panels. This stitch is reversible so you can follow all the instructions above for the second front panel and then flip it when seaming.
Tip: If you made some adjustments to the length of your front panel, no problem – you can go back and adjust your back panel so that the front and back panels are the same length.
Crochet the Main Sleeve Panel (Make 2)
We will now crochet the two sleeve panels.
Calculate the length of your foundation chain as follows:
| Take your “Armhole Depth Measurement” and double it. (Note if the widest part of your arm is your bicep circumference, you should use this measurement instead – without doubling it) | Our armhole depth measurement is 6.5 inches. Doubling it = 13 inches. |
| Add 2 inches for positive ease | 13 + 2 = 15 inches. |
Chain a length as calculated above counting the number of chains at the same time. Do not pull the chain too tight when you measure it.
Make sure the number of chains ends on a multiple of 11. If not, increase the number of chains so that you finish on a multiple of 11.
Add 3 more chains.
For example Kiks + Jack crocheted 75 chains to reach a total length of 15 inches as per our calculation. However 75 is not a multiple of 11 (it does not divide into 11 evenly). Therefore we increase the number of chains to a total of 77 so that it is a multiple of 11. We then crocheted an additional 3 more chains for a total of 80 chains.
Row 1: 1sc into 2nd ch from hook, ch1, sk st, 1sc in next st, *ch3, sk 3st, 1sc in next st, ch3, sk 3st, 1sc in next st, ch2, sk 2st, 1sc in next st, rep from * until the last 2st, ch1, sk st, 1sc in last st. Turn
Row 2: ch3, [dc2tog, ch2, dc2tog] in 1st ch sp, ch1, sk next sc, 1sc in next sc, *ch1, sk ch-3 sp, dc2tog in next ch-2 sp, [ch2, dc2tog] in same ch-2 sp 3 more times (it should now look like 4 x dc2tog petals), ch1, sk next sc, 1sc in next sc, rep from * ending with a ch1, sk ch-3 sp, [dc2tog, ch2, dc2tog] in last ch-sp (it should look like a “half flower” with only 2 petals), 1dc in last sc. Turn
Row 3: ch1, 1sc in 1st st, *ch3, 1dc2tog in top of each next 4 dc2tog, ch3, sc in next ch-2sp, rep from * to end of row, ending with a ch3, sc in top of tch. Turn
Row 4: ch1, sc in 1st st, *ch3, sc in top of next dc2tog, ch2, sk next 2 dc2tog, sc in top of next dc2tog, ch3, sc in next sc, rep from * to end, ending with a ch3, sc in top of tch. Turn
Row 5: ch1, sc in 1st sc, *ch1, sk ch-3 sp, dc2tog in next ch-2sp, [ch2, dc2tog] in same ch-2 sp 3 more times (it should look like 4 petals sitting above the 4 petals below), ch1, sk next sc, sc in next sc, rep from * to end, ending with a ch1, sc in top of tch. Turn
Row 6: ch3, 1dc2tog in top of each next 2 dc2tog, ch3, sc in next ch-2sp, ch3, *dc2tog in top of each next 4 dc2tog, ch3, sc in next ch-2sp, ch3, rep from * to last 2 dc2tog, 1dc2tog in top of each next 2 dc2tog, dc in last sc. Turn
Row 7: ch1, sc in 1st st, ch1, sk 1 dc2tog, sc in next dc2tog, ch3, sc in next sc, ch3, *sc in top of next dc2tog, ch2, sk 2 dc2tog, sc in top of next dc2tog, ch3, sc in next sc, ch3, rep from * to last 2dc2tog, sc in next dc2tog, ch1, sk 1 dc2tog, sc in top of tch. Turn.
Important Note: Before continuing, check that the width of your sleeve is wide enough to fit around the largest part of your arm – eg your armhole depth or your bicep. If you need to adjust the width, restart by increasing or decreasing the foundation chain length – just remember to follow the correct stitch multiple.
Repeat rows 2 – 7 until your sleeve reaches your “Arm Length Measurement“. You will be seaming this to the main panels so it may be helpful to end on a Row 4 or Row 7 or you can crochet a simple even single crochet row across the top.
Fasten off. Remember you need to crochet two identical sleeve panels.
Assembling The Lacy Holiday Crochet Tie-Up Cardigan
Kiks + Jack Crochet strongly recommends blocking your panels before assembling your sweater. Blocking helps each piece hold the exact shape and size you need. To block, we pin our panels onto an old yoga mat, carefully adjusting the edges and shaping them so that the front and back panels match, and both sleeves are alike. Once pinned, we spray the pieces with water, paying special attention to the edges and making sure the fabric is thoroughly saturated. Leave the pins in place until the panels are fully dry.
Step 1: Seam the Front and Back Panels at the shoulder.
Place a front panel on top of the back panel and line it up at the side and shoulder. With a yarn needle and matching yarn, seam the panel together across the shoulders. Start from the edge and seam up to the end of the front panel. Fasten off. Do the same with the second front panel on the other side of the back panel.
Step 2: Line up your sleeves at the midway point to the shoulder and seam. Open up the two panels (now seamed at the shoulders) so that the right side is facing the floor and the wrong side is facing upwards. Take one of your crocheted sleeves and fold it in half lengthways. Place a stitch marker at the top of your sleeve at the centre point. With the wrong side of the sleeve facing up, attach this stitch marker to the left edge of the left shoulder seam.
Do the same on the right side with the other sleeve.
Tip: Check your sleeve length. We recommend temporarily attaching the sleeve panel to the body using a few locking stitch markers so you can try it on for fit. If you’d like your sleeves longer, just add more rows to your sleeve panel. To do this, unpick the final knot where you fastened off, rejoin your yarn, and crochet as many extra rows as you need. If you prefer shorter sleeves, unpick the knot and unravel (frog) rows until you reach the length you want. Remember to adjust the second sleeve the same way so both sides match evenly.
When everything is perfect, using a yarn needle and matching yarn, seam the sleeves to the main panels (wrong side facing up).
Step 3: Seam the sides of the cardigan and the bottom of the sleeve together. Fold the panels and sleeve panels at the seamed shoulders so that your cardigan is facing wrong side out. With a yarn needle and matching yarn, seam the sides of the two panels together up to the armpit and along the bottom of the sleeve.
Fasten off.
Crochet the Neckline Edge for The Lacy Holiday Crochet Tie-Up Cardigan
Turn the cardigan correct side out.
Use a smaller hook size. We dropped from a size 4mm to a 3.5mm.
Attach the yarn at the bottom of your front panel. Start with the side that works best for you.
ch1, sc around the entire front opening from one end at the bottom all around the neckline to the other end. Try to crochet evenly around the neckline, ie. approximately the length of one stitch. You can crochet 1sc into regular spaces and 2sc into larger spaces. End on a multiple of 4 + 1. Turn
We crocheted 212 + 1 (total 213) single crochets around the neckline. We marked each 20 stitches with a stitch marker to help us with the count.
ch1, sc into 1st st, *sk1, 5dc in next st, sk1, 1sc in next st, rep from * to end, ending with a sc in last st.
Fasten off.
Crochet the Centre Tie
Use a smaller hook size. We dropped from a size 4mm to a 3.5mm.
Chain a length that allows you to tie the two front panels together in the centre middle. We crocheted approximately 18 inches. Turn and single crochet into the 2nd chain from the hook, sc in each st across the row until the last st. Fasten off. Tip: we left a long tail then used a yarn needle to weave the tail back into the string.
Thread the chain through both sides in the centre. We inserted our chain between two double crochets in the 5dc cluster. Tie in a bow.
Finish & Celebrate The Lacy Holiday Crochet Tie-Up Cardigan
Weave in all your ends.
Congratulations you have finished The Lacy Holiday Crochet Tie-Up Cardigan and we hope you enjoyed this free crochet pattern.
Please support us. We are trying to keep all our crochet patterns free for everyone, when you access them online. We meet the costs of running this website through coffee donations at https://ko-fi.com/kiksandjackcrochet and ad revenue. When you buy us a cup of coffee, you buy us a cup of motivation. Thank you for keeping us motivated and inspired every day to keep designing free crochet patterns for you.
It would be amazing to see a photo of your completed work on instagram. Tag your version of The Lacy Holiday Crochet Tie-Up Cardigan @kiksandjackcrochet or just click on the link to follow us for our upcoming free designs.