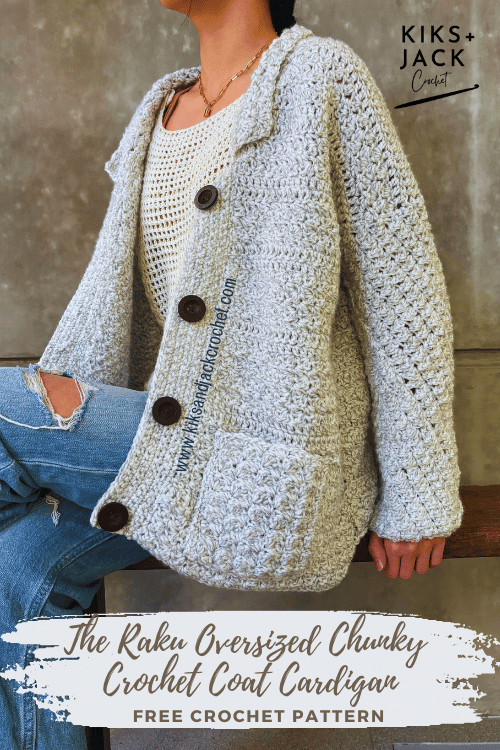
The Raku Oversized Chunky Crochet Coat Cardigan is a free crochet pattern that is made to measure, size inclusive and designed to be intuitive and advanced beginner friendly.
Are you ready to crochet an oversized crochet coat that you will be reaching for time and time again as you run out the door? The Raku Oversized Chunky Crochet Coat Cardigan is going to be a staple in your wardrobe and a timeless classic. It also helps that the Grandpa style cardigans and coats are currently hugely popular.

Please help us: We are trying to keep all our crochet patterns free for everyone, when you access them online. We meet the costs of running this website through coffee donations at https://ko-fi.com/kiksandjackcrochet and ad revenue. When you buy us a cup of coffee, you buy us a cup of motivation. Thank you for keeping us motivated and inspired every day to keep designing free crochet patterns for you.
This timeless and versatile crocheted coat is perfect for chilly days, adding warmth and style to any outfit. The Raku Oversized Chunky Crochet Coat Cardigan uses one of our favourite stitches which is effectively a combination of single and double crochets. We changed up the stitch pattern with rows of basic stitches and we love the end result.
We wanted something a little more structured for The Raku Oversized Chunky Crochet Coat Cardigan compared to our previous draping cardigans. We used a slightly stiffer yarn from Bernat Yarn. It’s their Super Saver weight 4/worsted budget friendly yarn and it is available in so many colours. We love this marled grey because it adds more dimension to the already textured coat.

We can picture The Raku Oversized Chunky Crochet Coat Cardigan over sweaters and long sleeves in the winter months, and thrown over t-shirts and dresses in spring. We kept ribbing off the sleeves and the base to give it a more “coat” feel. This coat also pairs effortlessly with jeans, skirts and leggings making it a wardrobe staple all year-round.
If you love our crocheted cardigans and coats, check out The Buttoned Crochet Grandpa Coat Cardigan and The Victoria Easy Chunky Crochet Cardigan.
Let’s get started on The Raku Oversized Chunky Crochet Coat Cardigan Free Pattern.
It would be amazing to see a photo of your work in progress. Tag us and we would love to cheer you on @kiksandjackcrochet. Follow us on social media for more pattern releases:
DESCRIPTION of The Raku Oversized Chunky Crochet Coat Cardigan
The Raku Oversized Chunky Crochet Coat Cardigan is a casual coat with long sleeves and no ribbing on the base. It can be worn all season and features a small simple collar and opening. There is a simple stitch change between a beautiful textured crochet stitch and a few rows of basic stitch. The Raku Oversized Chunky Crochet Coat Cardigan free crochet pattern will show you how to add buttons and pockets. The cardigan is suitable for advanced beginners. It is designed to be long and oversized and we recommend using a slightly stiffer yarn.
The Raku Oversized Chunky Crochet Coat Cardigan is a free and easy crochet pattern available as a size inclusive made to measure pattern. It is advanced beginner friendly and uses weight 4/medium/ worsted yarn. This pattern accommodates for different gauges.
CROCHET MEASUREMENTS & SIZES
The pattern instructions for The Raku Oversized Chunky Crochet Coat Cardigan are made to measure, based on your required measurements.
Kiks + Jack Crochet will always try to write patterns that are “made to measure” (versus graded sized patterns) so that crocheters can get the wonderful benefits of making a garment that fits perfectly. However we do appreciate taking measurements can be inconvenient for some and have also provided standard measurements for those who wish to use it.
To use the Raku Oversized Chunky Crochet Coat Cardigan pattern you will need the following measurements and you should write them down for easy reference:
Chest/Bust: Measure around the fullest part of your chest/bust. Do not draw the tape too tightly.
Finished length: Measure from where you would like the coat to end, up to the top of your shoulder. We wanted our cardigan to hit well below our hips.
Armhole Depth: Measure from the top outside edge of the shoulder down to the armpit
Arm Length: With arm slightly bent, measure from armpit to wrist (or where you would like the sleeve to end)
Standard Sizing (For Reference)
If you would like to use standard sizing for the chest/bust – then for XS (S, M , L, XL, 2XL, 3XL, 4XL, 5XL) use approximately 28-30 (32-34, 36-38, 40-42, 44-46, 48-50, 52-54, 56-58, 60-62) inches or 71-76 (81-86, 91-96, 102-107, 112-117, 122-127, 132-137, 142-147, 152-158) centimetres.
If you would like to use standard sizing for arm length – then for XS (S, M , L, XL, 2XL, 3XL, 4XL, 5XL) use approximately 16.5 (17, 17, 17.5, 17.5, 18, 18, 18.5, 18.5) inches or 42 (43, 43, 44.5, 44.5, 45.5, 45.5, 47, 47) centimetres
If you would like to use standard sizing for armhole depth – then use approximately 6-6.5 (6.5-7, 7-7.5, 7.5-8, 8-8.5, 8.5-9, 9-9.5, 9.5-10, 10-10.5) inches or 15.5-16.5 (16.5-17.5, 17.5-19, 19-20.5, 20.5-21.5, 21.5-23, 23-24, 24-25.5, 25.5-26.5) centimetres
Note: The Raku Oversized Chunky Crochet Coat Cardigan is designed as an oversized fit with significant positive ease.
CROCHET GAUGE
Using a 5mm crochet hook, approximately 13 double crochets across and approximately 8 rows of double crochet in 4″ x 4″ (10 cm x 10 cm).
The Raku Oversized Chunky Crochet Coat Cardigan pattern can accommodate different gauges however we recommend using a yarn gauge similar to ours.
CROCHET MATERIALS for The Raku Oversized Chunky Crochet Coat Cardigan
This section contains product affiliate links. We may receive a small commission (at no extra cost to you) if you make a purchase after clicking on one of these links.
We promise to only recommend products that we love and that we use. Thank you for supporting our small business.
Yarn brand Bernat Super Value Yarn Weight 4/Medium/Worsted. 197g per skein and 440 yards (or 402 m). Colour used for our version of The Raku Oversized Chunky Crochet Coat Cardigan is Grey Ragg.
Approximately 3.1 skeins or 1364 yards (or 1246 m) used for our garment (approximately S but oversized) with a finished width of 22 inches and a finished length of 24 inches.
If you like the “coat” look we suggest using a slightly stiffer yarn.
Large Buttons: We purchased these large brown buttons from Amazon. They are of great quality, come in a number of natural colours and are budget friendly. We used 5 buttons for our version. Our instructions are based on this button size so you may want to purchase buttons of similar width.
5 mm crochet hook (US 8) and 4 mm hook (US 6). We use many different crochet hooks and if you are looking for some great budget friendly ergonomic crochet hooks try these from Amazon. It comes in a set and the grip and the shape is amazing for beginner crocheters. However our absolute favourite, slightly more pricey crochet hooks are these crochet hooks. You can buy then in a set or individually. We started our collection just purchasing the size 4 ,5 and 6.
Yarn Winder!!! (Our new LOVE). We have held off on a yarn winder for a long time. We love the idea of crochet being simple with just a hook and some yarn. However we decided to get this yarn winder, because it was affordable and we weren’t sure about investing in a super fancy one yet. We love it because it breathes life back into scrappy yarn lying around that looks messy. It’s simple to use and is holding up really well for us.
Measuring Tape. We use a super budget friendly measuring tape. Make sure it has cm and inches (not all patterns are written with both). We are always crocheting on the go so we like our tapes small and compact and we put one in our design area, one in our bag and one in our car. Retractable works best! We use these super cheap mini measuring tapes from Amazon.
Stitch Markers. We use these locking crochet stitch markers from Amazon and these stitch markers that do not lock. They are cheap and colourful.
Blocking Pins. You should buy more pins than you think you need. If you are going to take the time to block don’t skimp on the pins. We like T shaped stainless steel pins that don’t rust when they get wet. We love these blocking T pins from Amazon and the tin means the pins don’t fall out on the floor.
Yarn Needle. Buy blunt needles with large eyes for yarn. We use these Yarn Needles because we like the convenient bottle, they are budget friendly and we get lots of them!
Scissors. We love these thread snippers because they are cheap, we get two of them AND they come with a case (some don’t). Don’t carry these without the case! After you use thread snippers you won’t want to snip with scissors.
Sharp Needle and Matching Thread. To sew your buttons on to your crocheted coat.
CROCHET STITCHES & ABBREVIATIONS
The Raku Oversized Chunky Crochet Coat Cardigan pattern uses US terminology.
ch = chain (With one loop on your hook, yarn over and pull through the loop)
sc = single crochet (Insert hook into desired stitch. Yarn over and pull through the stitch. You now have two loops on your hook. Yarn over and pull through all two loops)
hdc = half double crochet (Yarn over and insert hook into desired stitch. Yarn over and pull through the stitch. You now have three loops on your hook. Yarn over and pull through all three loops)
dc = double crochet (Yarn over and insert hook into desired stitch. Yarn over and pull through the stitch. You now have three loops on your hook. Yarn over and pull through the first two loops. You now have two loops on your hook. Yarn over and pull through all two loops)
BLO = back loop only
tch = turning chain
sl st = slip stitch (Insert hook into desired stitch. Yarn over and pull through the stitch and the loop on your hook)
st = stitch
sk = skip stitch
* = repeat the instructions following the * as directed
Note unless stated otherwise turning chains do not count as a stitch if there are 1 or 2 chains and the turning chain does count as a stitch if there are 3 or 4 chains.
SUMMARY of CONSTRUCTION for The Raku Oversized Chunky Crochet Coat Cardigan
The Raku Oversized Chunky Crochet Coat Cardigan is made by first crocheting the back panel. We will then continue on crocheting the first front panel followed by the second front panel. This will make up the front of the cardigan. We will seam the sides followed by the sleeves. The sleeves will be crocheted directly on to the coat until it reaches the required sleeve length.
Finally we will show you how to crochet a small collar around the neckline. We will also show you how to crochet edging for your buttons and button holes. Finally we crochet two pockets and sew these on to the coat. All these finishing touches for The Raku Oversized Chunky Crochet Coat Cardigan are customizable.
PERMISSIONS AND COPYRIGHT for The Raku Oversized Chunky Crochet Coat Cardigan
You may not publish or share any pattern on this website www.kiksandjackcrochet as your own including this pattern The Raku Oversized Chunky Crochet Coat Cardigan. Except as permitted by the copyright law applicable to you, you may not reproduce or communicate any of the content on this website, including files downloadable from this website, without the permission of the copyright owner, Kiks + Jack Crochet.
You may not use any Kiks and Jack Crochet photo as your own photo.
You may crochet items to sell using The Raku Oversized Chunky Crochet Coat Cardigan pattern upon permission by email at [email protected]. Please link back to this post in exchange.
PATTERN INSTRUCTIONS for The Raku Oversized Chunky Crochet Coat Cardigan
Crochet the Back Panel
Use the larger hook.
Calculate the length of your foundation chain as follows:
| Calculation | Kiks + Jack Crochet Example |
| Halve your “Chest/Bust Measurement“ | Our chest/bust measurement = 32 inches around Half our chest/bust measurement = 32/2 = 16 inches |
| Add additional 4-5 inches for positive ease and to achieve an oversized look. Depending on your gauge it may increase in width (we will check it again) | 16 + 5 = 21 inches |
Chain a length as calculated above and count the number of chains at the same time. Do not pull the chain too tight when you measure it. Keep it loose.
Make sure the total number of chains are equal to a multiple of 3. If they do not finish on a multiple of 3, then increase the number of chains so the total number is equal to a multiple of 3.
Add one more chain.
Kiks + Jack’s example: We chained a length that was equal to 21 inches and 65 chains. We increase this to 66 chains so that it is a multiple of 3. We then add one more chain so the total chains equals 67.
Row 1: ch3 (does not count as a st), dc in 4th ch from hook, dc across to the end. Turn
Row 2: ch2, 2dc in 1st st, sk next 2st, *[1sc, 2dc] in next st, sk next 2st, rep from * towards the end of row with 1sc in last st. Turn
Row 3: ch1 (counts as a sc), 2dc in 1st st, sk next 2st, *[1sc, 2dc] in next st, sk next 2st rep from * towards the end of row with 1sc in top of tch. Turn
Tip: Think of each [1sc, 2dc] as a cluster, and you are crocheting clusters between the clusters from the previous row.
Row 4: repeat row 3
This is a good time to check if you are completely happy with the width of the coat before you crochet any further. You may want to hold it up against you after 4 rows of crochet to check. If the width is perfect keep going. However if you would like to make changes to the width, it is best to start again increasing or decreasing the number of chains that you originally used making sure you follow the stitch multiple. This is one of the benefits of a made to measure pattern – it’s intuitive and allows you to make adjustments based on your yarn, your measurements and your desired look.
Row 5-7: repeat row 3
Row 8: ch3, dc into 2nd st, dc across ensuring you have the same number of dc as your initial number of chains. Turn. See example below.
In Kiks + Jack Crochet’s example we would crochet 67 dc across for row 8. We achieved this by crocheting approximately 3 dc per cluster and dc at the start and end. The more important thing is to ensure you crochet the same number of chains as your initial foundation chain.
Row 9: ch3, dc into 2nd st, dc across the row. Turn
Repeat row 2 to row 9 in that order, until the back panel is equal to your “Finished Length Measurement“. End on a row 8 or row 9. Turn
Do not fasten off.
Crochet the Main Front Panel
Continue to use the larger hook.
You will now crochet 2 panels that will make up the front of your cardigan. The front panels will have some shaping at the top (like a V neck) that will eventually be “covered” by the collar. You will use the working yarn from the back panel and start crocheting down one side for the first front panel. Here is a diagram to illustrate:

You will need these measurements to work out the amount of shaping
| Measurements | Kiks+Jack Crochet Example |
| Measurement A = the width of your back panel in inches | Our back panel width = 22 inches |
| Measurement B = (Measurement A divided by 2) x 80% | (22/2) x 0.8 = 8.8 inches (approx) |
| Measurement C = Measurement B x 80% | 8.8 x 0.8 = 7 inches (approx) |
Using a measuring tape, measure out Measurement C from the working yarn edge towards the centre. Place a stitch marker.
Row 1: ch3 (counts as a stitch), dc in 2nd st, dc across towards the stitch marker and count the number of dc at the same time. Stop when you reach the stitch marker. Increase or reduce a stitch to ensure you end on a multiple of 3 + 1. Turn
In Kiks + Jack’s example we would dc across until we reached our stitch marker based on 7 inches. At this point we counted 21 stitches which is a multiple of 3 and so we added one more stitch to equal 22 stitches.
Row 2: ch3, dc in 2nd st, dc across towards the end, dc in tch. Turn.
Row 3: ch1 (counts as a sc), 2dc in 1st st, sk next 2st, *[1sc, 2dc] in next st, sk next 2st, rep from * towards the end of row with [1sc, 2dc] in top of tch. Turn
Row 4: ch1 (counts as a sc), 2dc in 1st st, sk 1 st, [1sc, 2dc] between clusters, sk next 2st, *[1sc, 2dc] in next st, sk next 2st, rep from * towards the end of row with 1sc in top of tch. Turn
Stop to take a look at what you have crocheted in rows 3 and 4. You should have slightly extended the width of your front panel. You will continue to move from Measurement C width to Measurement B width. The next two rows will be regular rows.
Row 5-6: ch1 (counts as a sc), 2dc in 1st st, sk next 2st, *[1sc, 2dc] in next st, sk next 2st, rep from * towards the end of row with 1sc in top of tch. Turn
Row 7: repeat row 3
Row 8: repeat row 4
Row 9: ch3, dc in 2nd st, dc across to the end, dc in tch
Row 10: ch3, dc in 1st st, dc across to the end, dc in tch
Take a measurement of the width at this point. Repeat rows 3-10 in that order until the width increases to approximately Measurement B (give or take 1/2 an inch is fine). Do not worry if the edges are not perfectly straight as we will be straightening them later and a collar will be crocheted over this area.
In Kiks + Jack’s example we would crochet rows 3-10 in that order until the width of the front panel moves from 7 inches approximately to 8.8 inches approximately.
When the width reaches Measurement B, then at this point follow the regular stitch pattern without the increases. Start on the row that is right for your stitch pattern. In Kiks and Jack’s example we reached Measurement B at the end of a double crochet row, so we would start on Row 2 below. Here is the regular stitch pattern again without the increases. Remember to start on the correct row for you – ie. the next row that matches your stitch pattern.
Row 1: ch3, dc into 2nd st, dc across the row. Turn
Row 2: ch2, 2dc in 1st st, sk next 2st, *[1sc, 2dc] in next st, sk next 2st, rep from * towards the end of row with 1sc in last st. Turn
Row 3: ch1 (counts as a sc), 2dc in 1st st, sk next 2st, *[1sc, 2dc] in next st, sk next 2st, rep from * towards the end of row with 1sc in top of tch. Turn
Row 4-7: repeat row 3
Row 8: ch3, dc into 2nd st, dc across the row (a multiple of 3 + 1). Turn
Repeat row 1 to row 8 in that order, until the front panel is equal to your “Finished Length Measurement” and is the same length as your back panel. Your last row should be a double crochet row to end with a neat edge.
Fasten off.
Remember you need to crochet the second front panel on the other side. For the other panel you would attach a yarn on the top edge on the other side and follow all the instructions in this section again.
Assembling
Kiks + Jack Crochet highly recommends blocking your panels before assembly. Blocking your panels will set your panels to the shape and size you want and give it a polished look.
We block our panels by pinning all the pieces on to an old yoga mat and manipulating the shape and edges. We then spray it with water focusing on the edges and ensuring it is well saturated. Do not remove the pins until the panels are completely dry.
With your panels wrong side facing out measure from the top of the left shoulder down the side the “armhole depth measurement”. Place a locking stitch marker here to indicate the bottom of the armpit. Put it on and see if you are comfortable with the depth of the arm opening. Make adjustments if necessary and do the same on the other side. When you are happy with the depth of the armholes, use a matching yarn and a yarn needle and seam the sides of the coat cardigan from the bottom up to the stitch markers. Make sure you are seaming on the wrong side (facing out).
Crochet the Sleeves (Make 2)
Note that the stitch pattern changes for the sleeve panel.
Turn your coat right side out. We will now crochet the sleeves directly on to the coat cardigan.
Attach a matching yarn at the base of the armpit.
Round 1: ch1, sc in 1st st, sc evenly around the armhole opening and ensure you finish on a multiple of 3, sl st to join at top of tch. The key is to be even in your stitching.
Round 2: ch2, 2dc in 1st st, *sk next 2st, [1sc, 2dc] in next st, rep from * around ending with a sl st to join at top of tch. Turn
Round 3: ch1 (counts as a sc), 2dc in 1st st, *sk next 2st, [1sc, 2dc] in next st, rep from * around ending with a sl st to join at top of tch. Turn
Repeat round 3 until the sleeve is equal to your “Arm Length Measurement” or wherever you would like your sleeve to end.
Fasten off.
Repeat on the other side.
Crochet the Neckline and Collar
Use the smaller hook size.
Attach a matching yarn at the bottom of your front panel. Start with the side that works best for you.
ch1, sc around the entire front opening from one end at the bottom all around the neckline to the other end. Try to crochet evenly around the neckline. This is more important than the exact number of stitches around. You may crochet 2sc in larger spaces. Fasten off.
We will now crochet the small collar around the neckline.
Step 1: Place two locking stitch markers on the front panels at the base of the “V” (ie. approximately at Measurement B in the diagram above)
Using a measuring tape double check to make sure the two locking stitch markers are even lengths down from the shoulders.
Attach a yarn to one side where one of your stitch markers are placed.
Row 1: ch2, 2dc in 1st st, sk next 2st, *[1sc, 2dc] in next st, sk next 2st, rep from * around the top of the neckline towards the second stitch marker on the other side. You should end with a sc as close to the second stitch marker as possible. Turn.
Row 2: ch1 (counts as a sc), 2dc in 1st st, sk next 2st, *[1sc, 2dc] in next st, sk next 2st, rep from * towards the end of row ending with 1sc in top of tch. Turn
Row 3-7: repeat row 2
Take a look at the width of the collar. If you would like it slightly wider you can repeat another row 2.
For reference, when folded back Kiks + Jack’s collar width is approximately 3 inches.
Step 4: We suggest you wet block the collar (at some stage) to give it the shape and to keep it folded back
Crochet the Button Holes
Use the smaller hook size.
We will crochet the button holes and the edge where you will sew the buttons. Note that this pattern is based on large sized buttons approximately 1.2 inches wide.
Step 1: Work out which side you want buttons and which side you want button holes. Kiks + Jack Crochet wants buttons on the left side and button holes on the right side when the coat cardigan is worn.
Let’s start with crocheting the side you will sew the buttons on. Attach a yarn to the bottom of the side that you want buttons (we would attach it on the left side).
Row 1: ch2, sc into second st, sc up to just below the collar where you previously placed a stitch marker. Turn
Row 2 – 7: repeat row 1
After row 7, our button edging is just over 2 inches. This was a sufficient width to fit our brown buttons and give us closure after we crochet a similar width on the other side. You may need to crochet more or less rows to suit the width of your buttons and to achieve closure.
Fasten off.
Step 2: Identify the number of buttons you would like to use. Kiks + Jack Crochet wanted 5 buttons. Place one button at the top and one button at the bottom. Using a measuring tape, place your remaining buttons evenly between the two. Using locking stitch markers, mark the spots for each button so when you remove the buttons you now have stitch markers indicating where the buttons should be.
Step 3: Crochet the other side ie. the button holes. Attach a yarn to the bottom of the other side (we would attach on the right side).
Row 1: ch2, sc into 2nd st, sc up to just below the collar where you previously placed a stitch marker (make sure it is the same distance as the button edging on the other side). Turn
Row 2-3: repeat row 1
Using a measuring tape and stitch markers, mark out where the button holes should be. They should directly match the stitch markers on the other side that are marking the buttons.
Row 4 (the button hole row): ch2, sc into 2nd st, sc into every st except where you need to make a button hole. When you need to make a button hole you ch2, sk2, then continue to sc in every stitch until you reach the next button hole where once again you ch2, sk2. Turn
Tip: Based on our gauge and the size of our buttons, a chain 2 (then skip 2) was the appropriate button hole size so that the button wasn’t too tight or too loose going through the hole. After you have created one button hole, test it out. For example, you may find a chain 1 (then skip 1) is a better fit for your button.
Row 5: ch2, sc into 2nd st, sc into every st. When you get to a button hole space, you are crocheting into the space. Turn
In our version we crochet 2sc into every button hole space.
Row 6-7: ch2, sc into 2nd st until the end. Turn
Fasten off.
Using a sewing needle and matching sewing thread, sew your buttons on the button side where you have placed stitch markers.
Crochet the Pockets
Use the larger hook size.
Chain and count the desired width of the pocket. Make sure the chain is a multiple of 3.
Add one more chain.
Kiks + Jack crocheted 18 chains to give us a width of approximately 5 inches then added 1 more chain to give a total of 19 chains.
Row 1: ch2, 2dc in 3rd ch from hook, sk next 2st, *[1sc, 2dc] in next st, sk next 2st, rep from * towards the end of row with 1sc in top of tch. Turn
Row 2: ch1 (counts as a sc), 2dc in 1st st, sk next 2st, *[1sc, 2dc] in next st, sk next 2st, rep from * towards the end of row with 1sc in top of tch. Turn
Repeat row 2 until the pocket reaches the desired length.
Kiks + Jack crocheted row 2 until the pocket length is equal to approximately 5 inches.
Do not fasten off. We will now crochet sc around the sides and bottom of the pocket. We did not single crochet over the top of the pocket as we liked the design.
ch2, turn, sc into the next st, sc around the side, bottom and other side of the pocket. At the corners, sc into the st, ch2, sc into the same st.
Fasten off.
Crochet two identical pockets.
Using a yarn needle and matching yarn, sew the pockets on to the cardigan making sure the pocket is straight and leaving the top open.
Fasten off.
Finish & Celebrate The Raku Oversized Chunky Crochet Coat Cardigan
Weave in all your ends.
Congratulations you have finished The Raku Oversized Chunky Crochet Coat Cardigan and we hope you enjoyed this free crochet pattern.
Please help us: We are trying to keep all our crochet patterns free for everyone, when you access them online. We meet the costs of running this website through coffee donations at https://ko-fi.com/kiksandjackcrochet and ad revenue. When you buy us a cup of coffee, you buy us a cup of motivation. Thank you for keeping us motivated and inspired every day to keep designing free crochet patterns for you.
It would be amazing to see a photo of your version of The Raku Oversized Chunky Crochet Coat Cardigan on instagram. Tag us @kiksandjackcrochet.
Follow us on social media for new pattern releases.


2 thought on “Oversized Chunky Crochet Coat Cardigan Free Pattern”
Comments are closed.