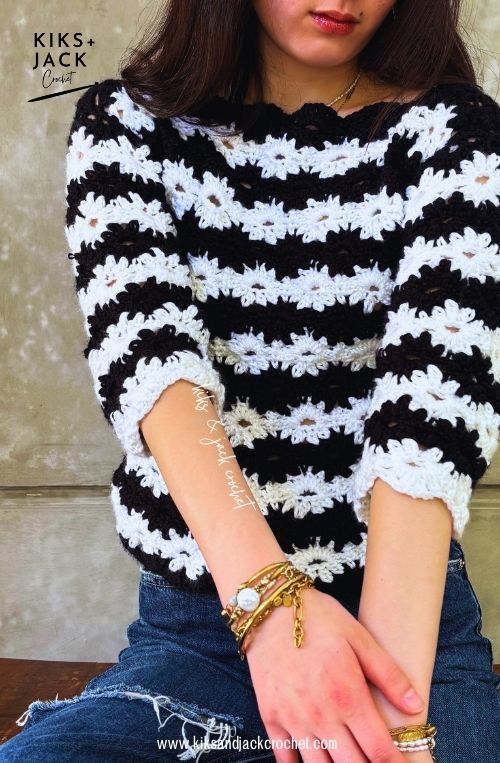
The Esther Easy and Beautiful Flower Crochet Sweater is a free, size-inclusive crochet pattern for a gorgeous mid sleeve sweater that uses a fun and interesting flower stitch. This mid-sleeve design is easy to customize, with full step-by-step made to measure instructions post below. Use the interactive table of contents below to help you navigate through this blog.
**Update: We’ve created a video tutorial showing how to crochet this beautiful Black & White Flower Stitch. Scroll down to the “Pattern Instructions” section, where we have embedded the video so you can watch the row-by-row tutorial if you prefer. This video complements the full written pattern below.
Recently a fellow crafter posted this quote: “Crochet is the quiet rebellion against the instant gratification of life”.
It got us thinking – in a world where it feels like AI is the new norm, what in life is going to stay and what is going to fall by the wayside in our pursuit for efficiency? It would be nice to think that as things keep moving faster, there will always still be an interest in seeking fulfillment in the creative process.
Something to think about the next time you mess up on one of your crochet panels … or take way too long to finish one of your WIPs …. or like us for this pattern, frog something 10 times before finding the perfect stitch.
Remember you are simply “rebelling” against the instant gratification of life! Lol.
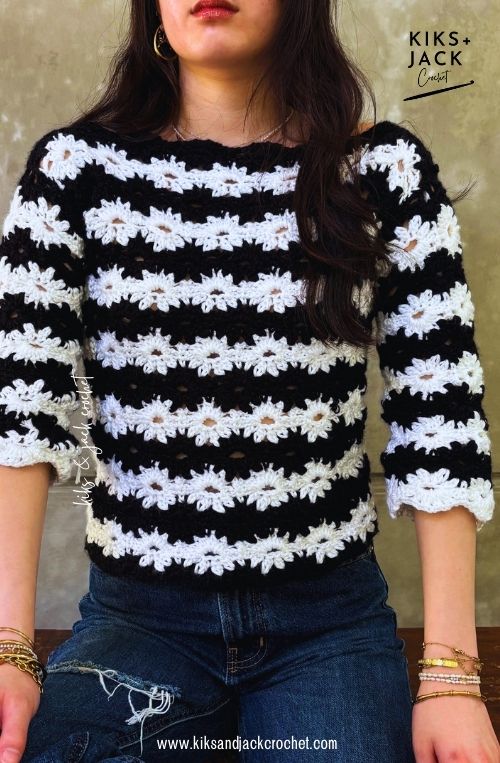
That’s what happened with the development of The Esther Easy and Beautiful Flower Crochet Sweater. We received all this beautiful yarn from Furls Crochet (thank you Furls for sponsoring the yarn and hooks for this pattern!) and we knew instantly that we wanted to create a striking black and white striped type sweater. Sometimes we sketch out our designs and start knowing exactly what we want to do. Other times we just freely crochet until we like what we see. That’s what we did for this design and it took us days of frogging until we saw what had been a blurry concept in our mind! We hope you like it too.
We are trying to keep all our crochet patterns free for everyone, when you access them online. We meet the costs of running this website through coffee donations at https://ko-fi.com/kiksandjackcrochet and ad revenue. When you buy us a cup of coffee, you buy us a cup of motivation. Thank you for keeping us motivated and inspired every day to keep designing free crochet patterns for you.
Even though the stitch is so pretty and striking due to the contrasting colors we kept everything else pretty simple! This is definitely a beginner design! No ribbing, straight mid length sleeves and a basic neckline. We love it because it has just the right amount of “home made DIY” without it looking too “craftsy”. The black and white contrast makes us want to wear this out at night with a satiny black skirt and little heels – although knowing us it’s highly likely we will wear this over jeans lol.
We have used the gorgeous Wander yarn before in The Wanderers Relaxed Fit Crochet V Neck Sweater and the sister pattern The Wanderers Relaxed Fit Crochet Cardigan. We heard that they may be taking a break from selling this yarn to focus on their crochet hooks – soooo sad as we love crocheting with this yarn and the colors are incredible. If that’s the case you can substitute any weight 4 yarn. All our patterns are made to measure so you do not need to swatch exactly.
Let’s get started on Esther Easy and Beautiful Flower Crochet Sweater. Please support us and follow us on social media. You will also stay up to date with Kiks + Jack Crochet Pattern releases and maybe we will be lucky enough to see your work in progress on this sweater.
DESCRIPTION of The Esther Easy and Beautiful Flower Crochet Sweater
The Esther Easy and Beautiful Flower Crochet Sweater is a casual sweater top, that features a beautiful flower stitch and crocheted in two contrasting colors as a stripe. The flattering 3/4 mid sleeves hit below the elbow and give it a casual modern look. The neckline is designed as a simple boatneck and can be customized so that it sits off the shoulder or on the shoulder. There is no ribbing on the base of the sweater or at the neckline keeping this easy and beginner friendly.
The Esther Easy and Beautiful Flower Crochet Sweater is a free and easy crochet pattern available as a size inclusive made to measure pattern. It is beginner friendly and uses weight 4 yarn however the gauge is flexible.
CROCHET MEASUREMENTS & SIZES
The Esther Easy and Beautiful Flower Crochet Sweater pattern instructions are made to measure, based on your required measurements.
Kiks + Jack Crochet will always try to write patterns that are “made to measure” (versus graded sized patterns) so that crocheters can get the wonderful benefits of making a garment that fits perfectly. One of the best things about made to measure crochet patterns is that it celebrates the uniqueness of your body, something we all deserve from our handmade clothes. Unlike commercial sizing, which categorizes everyone into a limited range from XS to 5XL, made to measure patterns let you decide the fit based on your actual measurements. However we do appreciate taking measurements can be inconvenient for some and have also provided standard measurements for those who wish to use it.
To use the Esther Easy and Beautiful Flower Crochet Sweater pattern you will need the following measurements and you should write them down for easy reference:
Chest/Bust: Measure around the fullest part of your chest/bust. Do not draw the tape too tightly.
Finished Length: Measure from your waistline (or where you would like the top to end) up to the top of your shoulder.
Arm to Below Elbow Length: Measure from armpit to just below your elbow (or where you would like the sleeve to end – it is designed to be mid sleeve.
Armhole Depth: Measure from the top outside edge of the shoulder down to the armpit
Standard Sizing (For Reference)
If you would like to use standard sizing for the chest/bust – then for XS (S, M , L, XL, 2XL, 3XL, 4XL, 5XL) use approximately 28-30 (32-34, 36-38, 40-42, 44-46, 48-50, 52-54, 56-58, 60-62) inches or 71-76 (81-86, 91-96, 102-107, 112-117, 122-127, 132-137, 142-147, 152-158) centimetres.
If you would like to use standard sizing for armhole depth – then use approximately 6-6.5 (6.5-7, 7-7.5, 7.5-8, 8-8.5, 8.5-9, 9-9.5, 9.5-10, 10-10.5) inches or 15.5-16.5, 16.5-17.5, 17.5-19, 19-20.5, 20.5-21.5, 21.5-23, 23-24, 24-25.5, 25.5-26.5) centimetres
Note: The Esther Easy and Beautiful Flower Crochet Sweater is designed as a loose fit with neutral ease.
CROCHET GAUGE for The Esther Easy and Beautiful Flower Crochet Sweater
The Esther Easy and Beautiful Flower Crochet Sweater pattern is made to measure and can accommodate for different gauges. You do not need to match our gauge or swatch, however try to select a yarn weight and hook size that is similar to ours.
We used a 4.5mm crochet hook (US 7) and a weight 4 yarn.
CROCHET MATERIALS for The Esther Easy and Beautiful Flower Crochet Sweater
This section contains product affiliate links. We may receive a small commission (at no extra cost to you) if you make a purchase after clicking on one of these links.
We promise to only recommend products that we love and that we use. Thank you for supporting our small business.
Yarn brand Wander by Furls Fiber Arts. Weight 4/Medium/Worsted. 100g per skein and 120 yards (or 109 m). Colour used for our version of The Esther Easy and Beautiful Flower Crochet Sweater is Obsidian and Alabaster.
Approximately 5.7 skeins or 684 yards (or 621 m) used for our garment in total. We used approximately 50% black and 50% white (approximately 3 skeins of each). Our finished width is approximately 16 inches and a finished length of 18 inches.
We have been informed that Wander yarn may be sold out soon. You could consider the following favorite weight 4 yarns as a substitute:
Yarn brand: Heartland by Lion Brand Yarn
Yarn brand: Softee Cotton by Bernat
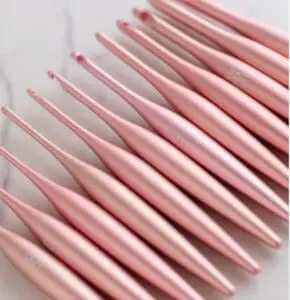
4.5 mm crochet hook (US 7). For this version we used the Metal Furls Crochet Hook gifted to us by Furls Crochet. All their hooks are absolutely stunning and you should definitely check out their site even just to marvel at how beautiful these hooks are!
Yarn Winder!!! (Our new LOVE). We have held off on a yarn winder for a long time. We love the idea of crochet being simple with just a hook and some yarn. However we decided to get this yarn winder, because it was affordable and we weren’t sure about investing in a super fancy one yet. We love it because it breathes life back into scrappy yarn lying around that looks messy. It’s simple to use and is holding up really well for us.
Measuring Tape. We use a super budget friendly measuring tape. Make sure it has cm and inches (not all patterns are written with both). We are always crocheting on the go so we like our tapes small and compact and we put one in our design area, one in our bag and one in our car. Retractable works best! We use these super cheap mini measuring tapes from Amazon.
Stitch Markers. We use these locking crochet stitch markers from Amazon and these stitch markers that do not lock. They are cheap and colourful.
Blocking Pins. You should buy more pins than you think you need. If you are going to take the time to block don’t skimp on the pins. We like T shaped stainless steel pins that don’t rust when they get wet. We love these blocking T pins from Amazon and the tin means the pins don’t fall out on the floor.
Yarn Needle. Buy blunt needles with large eyes for yarn. We use these Yarn Needles because we like the convenient bottle, they are budget friendly and we get lots of them!
Scissors. We love these thread snippers because they are cheap, we get two of them AND they come with a case (some don’t). Don’t carry these without the case! After you use thread snippers you won’t want to snip with scissors.
CROCHET STITCHES & ABBREVIATIONS
ch = chain (With one loop on your hook, yarn over and pull through the loop)
sc = single crochet (Insert hook into desired stitch. Yarn over and pull through the stitch. You now have two loops on your hook. Yarn over and pull through all two loops)
dc = double crochet (Yarn over and insert hook into desired stitch. Yarn over and pull through the stitch. You now have three loops on your hook. Yarn over and pull through the first two loops. You now have two loops on your hook. Yarn over and pull through all two loops)
dc2tog = double crochet 2 together (Yarn over and insert hook into desired stitch. Yarn over and pull through the stitch/space. You now have three loops on your hook. Yarn over and pull through the first two loops. You now have two loops on your hook. Yarn over and insert hook into desired stitch/space, yarn over and pull through the stitch. You now have four loops on your hook. Yarn over and pull through the first two loops. You now have three loops on your hook. Yarn over and pull through all three loops)
ch-sp = chain space (eg. crochet into the space and not the stitch)
tch = turning chain
sl st = slip stitch (Insert hook into desired stitch. Yarn over and pull through the stitch and the loop on your hook)
st = stitch
sk = skip stitch
* = repeat the instructions following the * as directed
Note unless stated otherwise turning chains do not count as a stitch if there are 1 or 2 chains and the turning chain does count as a stitch if there are 3 or 4 chains.
SUMMARY of CONSTRUCTION for The Esther Easy and Beautiful Flower Crochet Sweater
The Esther Easy and Beautiful Flower Crochet Sweater is made by first crocheting a back panel and a front panel. We do not crochet a ribbing for this design. We will also crochet two sleeve panels. We will then seam the front panel and the back panels at the shoulder and the sleeve panels directly on to the main panels.
The Esther Easy and Beautiful Flower Crochet Sweater is a made to measure pattern that is written specifically for beginners.
PERMISSIONS AND COPYRIGHT
You may not publish or share any pattern on this website www.kiksandjackcrochet as your own including this pattern The Esther Easy and Beautiful Flower Crochet Sweater. Except as permitted by the copyright law applicable to you, you may not reproduce or communicate any of the content on this website, including files downloadable from this website, without the permission of the copyright owner, Kiks + Jack Crochet.
You may not use any Kiks and Jack Crochet photo as your own photo.
You may crochet items to sell using The Esther Easy and Beautiful Flower Crochet Sweater pattern upon permission by email at [email protected]. Please link back to this post in exchange.
PATTERN INSTRUCTIONS for The Esther Easy and Beautiful Flower Crochet Sweater
Crochet the Main Back Panel
Calculate the length of your foundation chain as follows:
| Halve your “Chest/Bust Measurement“ | Our chest/bust measurement = 32 inches around Half our chest/bust measurement = 32/2 = 16 inches |
| Add additional 1-3 inches for positive ease. Important Note: this stitch is a “tight” stitch and may contract your width. You should add an additional inch on top of your desired width to compensate for this. For example if you want a more oversized sweater you can add 2 inches plus 1 more inch to compensate for the tight stitch. You should also ensure you conduct a check on the width (instructions below) to ensure it is not too tight. It will depend on your gauge and your yarn. | 16 + 1 = 17 inches (we wanted our top to be a little more fitted so we only added 1 inch) |
Start with Yarn A (eg. black)
Chain a length as calculated above counting the number of chains at the same time. Do not pull the chain too tight when you measure it.
Make sure the number of chains ends on a multiple of 11. If not, increase the number of chains so that you finish on a multiple of 11.
Add 3 more chains.
For example Kiks + Jack crocheted 85 chains to reach a total length of 17 inches as per our calculation. However 85 is not a multiple of 11 (it does not divide into 11 evenly). Therefore we increase the number of chains to a total of 88 so that it is a multiple of 11. We then crocheted an additional 3 more chains for a total of 91 chains.
🎥 Video tutorial — stitch only
If you would like to watch the stitch row-by-row, use the embedded video below (rows 1–7). The full written pattern and detailed row instructions are listed underneath, and you can jump to any row using the timestamps in the video.
Scroll down for the full written pattern and detailed row instructions.
Row 1: 1sc into 2nd ch from hook, ch1, sk st, 1sc in next st, *ch3, sk 3st, 1sc in next st, ch3, sk 3st, 1sc in next st, ch2, sk 2st, 1sc in next st, rep from * until the last 2st, ch1, sk st, 1sc in last st. Turn
The next row uses the dc2tog stitch. Need a reminder? It’s in the “Crochet Stitches” section.
Row 2: ch3, [dc2tog, ch2, dc2tog] in 1st ch sp, ch1, sk next sc, 1sc in next sc, *ch1, sk ch-3 sp, dc2tog in next ch-2 sp, [ch2, dc2tog] in same ch-2 sp 3 more times (it should now look like 4 x dc2tog petals), ch1, sk next sc, 1sc in next sc, rep from * ending with a ch1, sk ch-3 sp, [dc2tog, ch2, dc2tog] in last ch-sp (it should look like a “half flower” with only 2 petals), 1dc in last sc. Turn
Cut yarn A (eg black) and attach yarn B (eg white)
Row 3: ch1, 1sc in 1st st, *ch3, 1dc2tog in top of each next 4 dc2tog (the first 2 “petals” of the half flower and the next two petals of the next “flower” indicated by the arrows in the swatch below), ch3, sc in next ch-2sp, rep from * to end of row, ending with a ch3, sc in top of tch. Turn
(Note the swatch was crocheted in white – not black as it is easier to see).
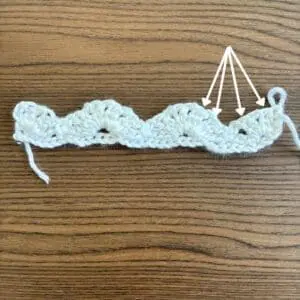
Row 4: ch1, sc in 1st st, *ch3, sc in top of next dc2tog, ch2, sk next 2 dc2tog, sc in top of next dc2tog, ch3, sc in next sc, rep from * to end, ending with a ch3, sc in top of tch. Turn
Row 5: ch1, sc in 1st sc, *ch1, sk ch-3 sp, dc2tog in next ch-2sp, [ch2, dc2tog] in same ch-2 sp 3 more times (it should look like 4 petals sitting above the 4 petals below), ch1, sk next sc, sc in next sc, rep from * to end, ending with a ch1, sc in top of tch. Turn
Important Note: Before continuing, take a moment to check that the width of your top is approximately equal to your calculation above and place it against you to check you like it. Sometimes your yarn is more stretchy than expected and sometimes you just change your mind on fit, so it is great to conduct an intuitive check here. Also this flower stitch can be quite restricting and depending on your gauge the width of your sweater may contract. If you want to adjust the width, then start again reducing or increasing the length of the foundation chain making sure you follow all the stitch multiple rules.
Cut yarn B (eg white) and attach yarn A (eg black)
Row 6: ch3, 1dc2tog in top of each next 2 dc2tog, ch3, sc in next ch-2sp, ch3, *dc2tog in top of each next 4 dc2tog, ch3, sc in next ch-2sp, ch3, rep from * to last 2 dc2tog, 1dc2tog in top of each next 2 dc2tog, dc in last sc. Turn
Row 7: ch1, sc in 1st st, ch1, sk 1 dc2tog, sc in next dc2tog, ch3, sc in next sc, ch3, *sc in top of next dc2tog, ch2, sk 2 dc2tog, sc in top of next dc2tog, ch3, sc in next sc, ch3, rep from * to last 2dc2tog, sc in next dc2tog, ch1, sk 1 dc2tog, sc in top of tch. Turn.
Repeat rows 2 – 7 until your top reaches the “Finished Length Measurement“. To follow our color stripe pattern you should crochet rows 6, 7 and 2 in black and rows 3-5 in white. We ended on the same color we started ie. black.
Crochet the Main Front Panel
Repeat all the instructions under “Crochet the Main Back Panel” so that you have an identical Front Panel.
Crochet the Sleeve Panel (Make 2)
We will now crochet the two sleeve panels. Remember you will need to make two identical sleeve panels.
Calculate the length of your foundation chain as follows:
| Take your “Armhole Depth Measurement” and double it. | Our armhole depth measurement is 6.5 inches. Doubling it = 13 inches. |
| Add 2 inches for positive ease | 13 + 2 = 15 inches. |
Start with Yarn A (eg. black)
Chain a length as calculated above counting the number of chains at the same time. Do not pull the chain too tight when you measure it.
Make sure the number of chains ends on a multiple of 11. If not, increase the number of chains so that you finish on a multiple of 11.
Add 3 more chains.
For example Kiks + Jack crocheted 54 chains to reach a total length of 15 inches as per our calculation. However 54 is not a multiple of 11 (it does not divide into 11 evenly). Therefore we increase the number of chains to a total of 55 so that it is a multiple of 11. We then crocheted an additional 3 more chains for a total of 58 chains.
Repeat all the pattern directions in the back panel from rows 1-7 following the same color pattern. At around row 5 test the width of the arm panel. It should be slightly wider than your bicep and your armhole depth. If the stitch has reduced the sleeve width so that it is too small or too uncomfortable, start the arm panel again by increasing the initial number of chains ensuring you follow all the stitch multiple rules.
If everything is fine, then repeat rows 2-7 until the total length of the sleeve is equal to your Arm Length Measurement. We stopped when our sleeves reached just below our elbow.
Fasten off.
Remember to crochet 2 identical sleeves.
Assembling The Esther Easy and Beautiful Flower Crochet Sweater
We highly recommend blocking your panels before assembly. We know it‘s exciting to start seaming, but taking this extra step will help set your panels to a more uniform shape and size and give your sweater a professional, polished finish. We pin each piece onto an old yoga mat, adjusting the shape and edges so the front and back match, and the sleeves match each other. Then we spray the panels generously with water, paying special attention to the edges until they’re fully saturated. Leave the pins in place until the panels are completely dry before moving on.
Step 1: Measure out the Neckline
We will now measure out the neckline for the two panels. Measure 4 inches in from the left edge of the back panel and place a stitch marker. Repeat the same on the front panel on both sides.
Attach the two panels together lining up the 4 stitch markers and securing the panels together with locking stitch markers. Place the panels over your head and double check you are happy with the neck opening. If you would like it tighter then move the locking stitch markers closer to your neck. If you would like the neck opening wider, then move the stitch markers away from your neck.
For Kiks + Jack’s version, our width is approximately 16 inches and we measured 3.5 inches from each side.
Step 2: Seam the Front and Back Panel at the shoulder.
Place the front and back panels together with the right sides facing together. With a yarn needle and matching yarn, seam the two panels together across the shoulders starting from the edge and up to the end of the neckline where you have marked it with stitch markers.
Fasten off. Make sure you seam on both shoulders.
Step 3: Seam the Sleeves to the Front and Back Panel
Open up the two main panels (now seamed at the shoulders) so that the right side is facing the floor and the wrong side is facing upwards. Take one of your crocheted sleeves and fold it in half lengthways. Place a stitch marker at the top of your sleeve at the centre point. With the wrong side of the sleeve facing up, attach this stitch marker to the left edge of the left shoulder seam.
Do the same on the right side with the other sleeve.
Kiks + Jack Crochet Tip: It is a good time to check the length of your sleeve. You can “seam” the sleeve panel with a few locking stitch markers to the main panel. Try it on.
If you would like the sleeve to be longer you can add a few more rows on to your sleeve. You do this by unknotting your final knot when you fastened off at the end of the sleeve panel, attaching matching yarn and crocheting a few more rows. Or you can reduce rows if you like your sleeves shorter. You do this by unknotting your final knot when you fastened off and pulling out (frogging) the rows. Make sure you do the same on the second sleeve.
When everything is perfect, using a yarn needle and matching yarn, seam the sleeves to the main panels (don’t forget, the wrong side should be facing up). Fasten off.
Step 4: Seam the sides of the sweater and the bottom of the sleeve together.
Fold the two panels and sleeve panels at the seamed shoulders so that your sweater is facing wrong side out. With a yarn needle and matching yarn, seam the sides of the two panels together up to the armpit and along the bottom of the sleeve. Fasten off.
Finish & Celebrate The Esther Easy and Beautiful Flower Crochet Sweater
Weave in all your ends.
We are trying to keep all our crochet patterns free for everyone, when you access them online. We meet the costs of running this website through coffee donations at https://ko-fi.com/kiksandjackcrochet and ad revenue. When you buy us a cup of coffee, you buy us a cup of motivation. Thank you for keeping us motivated and inspired every day to keep designing free crochet patterns for you to view at our blog online.
Congratulations you have finished The Esther Easy and Beautiful Flower Crochet Sweater. We hope you enjoyed this free and easy crochet pattern.
It would be amazing to see a photo of your completed work on instagram. Tag us @kiksandjackcrochet or follow us by clicking on the icons below.


