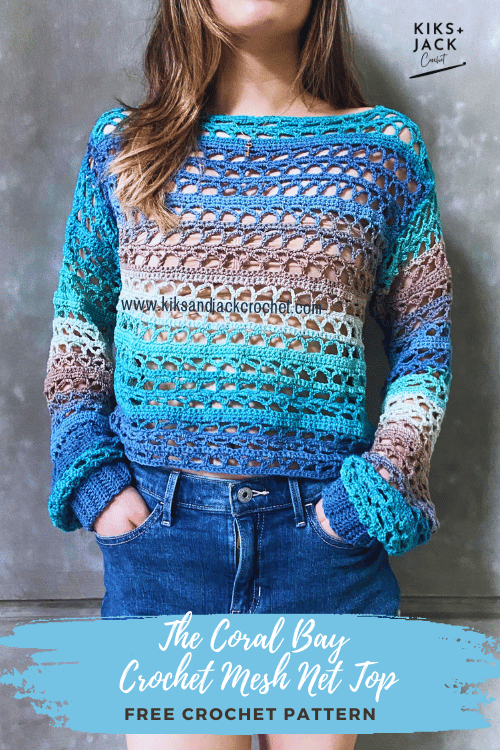
The Coral Bay Crochet Mesh Net Top is a free and easy crochet pattern that is made to measure, size inclusive and beginner friendly.
Designing a top can start from a number of places. Sometimes it starts with something you see, that leads to a drawing, that determines a crochet stitch, followed by yarn shopping (yay!). Sometimes it’s the other way around. It starts with yarn shopping, that leads to the touch and feel of a specific yarn, followed by an idea of how it would sit, or drape and then the design.
The Coral Bay Crochet Mesh Net Top started the second way. It started with discovering a beautiful yarn called Mandala String from Lionbrand yarn.

We are trying to keep all our crochet patterns free for everyone, when you access them online. We meet the costs of running this website through coffee donations at https://ko-fi.com/kiksandjackcrochet and ad revenue. When you buy us a cup of coffee, you buy us a cup of motivation. Thank you for keeping us motivated and inspired every day to keep designing free crochet patterns for you.
We used the colour Tune and it reminds us of the rolling beaches in Australia! It’s 100% acrylic but feels a little like working with mercerized cotton. Its a weight 1/super fine yet is super easy to work with. Sometimes working with weight 1 yarns can be a little daunting for a beginner and everything can feel a little clumsy, but with this yarn, we used a larger hook size and the crochet stitches rolled so easily!
The amazing thing about The Coral Bay Crochet Mesh Net Top is that it really can be worn all year. It looks great in summer, as breezy tops over swim suits and over little shorts. However you can also crochet it oversized and throw it over another top in spring and fall. In winter, try crocheting one in a solid colour using premium acrylic or wool blends, and wear it out with friends under coats and jackets. Crocheted mesh net tops sit well, never look creased and feel amazing.

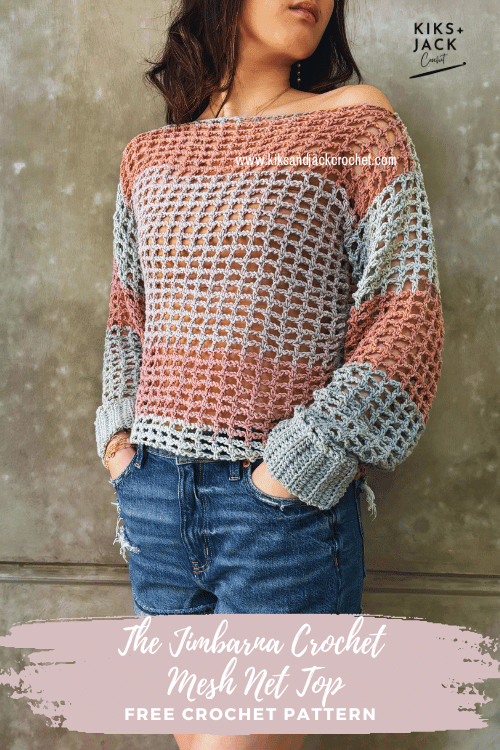
If you love crochet mesh net tops, take a look at other similar patterns like the Nusa Mesh Net Crochet Top Free Pattern and the Jimbaran Crochet Net Top.
Let’s get started on The Coral Bay Crochet Mesh Net Top!
It would be amazing to see a photo of your work in progress. Tag us and we would love to cheer you on @kiksandjackcrochet.
DESCRIPTION of The Coral Bay Crochet Mesh Net Top
The Coral Bay Crochet Mesh Net Top is a light and airy, long sleeved top that can be worn all season. It features a slightly oversized design with long sleeves and ribbing on the sleeve cuffs. The neckline is wide and flattering and can be customized to include an off the shoulder or on the shoulder design. This is a free and easy crochet pattern available as a size inclusive made to measure.
The Coral Bay Crochet Mesh Net Top is a free and easy crochet pattern available as a size inclusive made to measure pattern. It is a beginner pattern and involves a stitch pattern that uses primarily half double crochets and double crochets.
CROCHET MEASUREMENTS & SIZES
The Coral Bay Crochet Mesh Net Top pattern instructions are made to measure, based on your required measurements.
Kiks + Jack Crochet will always try to write patterns that are “made to measure” and size inclusive (versus graded sized patterns) so that crocheters can get the wonderful benefits of making a garment that fits perfectly. However we do appreciate taking measurements can be inconvenient for some and have also provided standard measurements for those who wish to use it.
To use this pattern you will need the following measurements and you should write them down for easy reference:
Chest/Bust: Measure around the fullest part of your chest/bust. Do not draw the tape too tightly.
Finished length: Measure from your waistline (or where you would like the top to end) up to the top of your shoulder. We wanted our top to hit a little lower than the waistline.
Arm Length: Measure from armpit to wrist (or where you would like the sleeve to end)
Armhole Depth: Measure from the top outside edge of the shoulder down to the armpit
Wrist Circumference: Measure from one point on your wrist all around your wrist.
Standard Sizing (For Reference)
If you would like to use standard sizing for the chest/bust – then for XS (S, M , L, XL, 2XL, 3XL, 4XL, 5XL) use approximately 28-30 (32-34, 36-38, 40-42, 44-46, 48-50, 52-54, 56-58, 60-62) inches or 71-76 (81-86, 91-96, 102-107, 112-117, 122-127, 132-137, 142-147, 152-158) centimetres.
If you would like to use standard sizing for arm length – then for XS (S, M , L, XL, 2XL, 3XL, 4XL, 5XL) use approximately 16.5 (17, 17, 17.5, 17.5, 18, 18, 18.5, 18.5) inches or 42 (43, 43, 44.5, 44.5, 45.5, 45.5, 47, 47) centimetres
If you would like to use standard sizing for armhole depth – then use approximately 6-6.5 (6.5-7, 7-7.5, 7.5-8, 8-8.5, 8.5-9, 9-9.5, 9.5-10, 10-10.5) inches or 15.5-16.5, 16.5-17.5, 17.5-19, 19-20.5, 20.5-21.5, 21.5-23, 23-24, 24-25.5, 25.5-26.5) centimetres
Note: Designed as a loose fit with significant positive ease.
CROCHET GAUGE
Using a 4mm crochet hook (US size 6), approximately 10 single crochets across and 8 rows of single crochet in 4″ x 4″ (10 cm x 10 cm).
Note The Coral Bay Crochet Mesh Net Top pattern is made to measure and can accommodate for different crochet gauges. However you should select a yarn with a similar gauge to this version.
CROCHET MATERIALS for The Coral Bay Crochet Mesh Net Top
This section contains product affiliate links. We may receive a small commission (at no extra cost to you) if you make a purchase after clicking on one of these links.
We promise to only recommend products that we love and that we use.
Yarn brand: Mandala String by Lion Brand Yarn. Weight 1/Super Fine/Fingering. 100g skein and 350 yards (or 320m).
You can also purchase Mandala String by Lion Brand Yarn here on Amazon and we always check this for great deals. If you are lucky your colour may be available and delivery may be faster.
Approximately 3 skeins or 1050 yards (or 960m) used for the Kiks + Jack Crochet version (approximately XS) with a finished width of 18 inches and a finished length of 16 inches.
Color used is Tune.
4 mm crochet hook (US size 6). We use many different crochet hooks and some of them can get quite pricey – but if you are a beginner and looking for some great budget friendly ergonomic crochet hooks try these from Amazon. It comes in a set and the grip and shape is amazing for beginner crocheters. We love these and recommend them to all our beginner crochet friends.
Measuring Tape. We use a super budget friendly measuring tape. Make sure it has cm and inches (not all patterns are written with both). We are always crocheting on the go so we like our tapes small and compact and we put one in our design area, one in our bag and one in our car. Retractable works best! We use these super cheap mini measuring tapes from Amazon.
Stitch Markers. We use these locking crochet stitch markers from Amazon and these stitch markers that do not lock. They are cheap and colourful.
Blocking Pins. You should buy more pins than you think you need. If you are going to take the time to block don’t skimp on the pins. We like T shaped stainless steel pins that don’t rust when they get wet. We love these blocking T pins from Amazon and the tin means the pins don’t fall out on the floor.
Yarn Needle. Buy blunt needles with large eyes for yarn. We use these Yarn Needles because we like the convenient bottle, they are budget friendly and we get lots of them!
Scissors. We love these thread snippers because they are cheap, we get two of them AND they come with a case (some don’t). Don’t carry these without the case! After you use thread snippers you won’t want to snip with scissors.
CROCHET STITCHES & ABBREVIATIONS
ch = chain (With one loop on your hook, yarn over and pull through the loop)
sc = single crochet (Insert hook into desired stitch. Yarn over and pull through the stitch. You now have two loops on your hook. Yarn over and pull through all two loops)
hdc = half double crochet (Yarn over and insert hook into desired stitch. Yarn over and pull through the stitch. You now have three loops on your hook. Yarn over and pull through all three loops)
dc = double crochet (Yarn over and insert hook into desired stitch. Yarn over and pull through the stitch. You now have three loops on your hook. Yarn over and pull through the first two loops. You now have two loops on your hook. Yarn over and pull through all two loops)
ch-3sp = chain 3 space
ch-7sp = chain 7 space
BLO = back loop only
tch = turning chain
st = stitch
sk = skip stitch
* = repeat the instructions following the * as directed
Note unless stated otherwise turning chains do not count as a stitch if there are 1 or 2 chains and the turning chain does count as a stitch if there are 3 or 4 chains.
SUMMARY of CONSTRUCTION for The Coral Bay Crochet Mesh Net Top
The Coral Bay Crochet Mesh Net Top is made by first crocheting a back panel and a front panel. We will crochet the panels bottom up ending with the neckline. We will then crochet the sleeve panels. Next we will crochet the sleeve cuff ribbing. Finally will seam the front panel and the back panels at the shoulder, seam the sleeve cuff ribbing to the sleeve, and then seam sleeves directly on to the panels.
PERMISSIONS AND COPYRIGHT for The Coral Bay Crochet Mesh Net Top
You may not publish or share any pattern on this website www.kiksandjackcrochet as your own including this pattern The Coral Bay Crochet Mesh Net Top. Except as permitted by the copyright law applicable to you, you may not reproduce or communicate any of the content on this website, including files downloadable from this website, without the permission of the copyright owner, Kiks + Jack Crochet.
You may not use any Kiks and Jack Crochet photo as your own photo.
You may crochet items to sell using The Coral Bay Crochet Mesh Net Top pattern upon permission by email at [email protected]. Please link back to this post in exchange.
PATTERN INSTRUCTIONS for The Coral Bay Crochet Mesh Net Top
Crochet the Main Back Panel
Calculate the length of your foundation chain as follows:
| Halve your “Chest/Bust Measurement“ | Our chest/bust measurement = 32 inches around Half our chest/bust measurement = 32/2 = 16 inches |
| Add additional 2-3 inches for positive ease and a slightly oversized look (it will also increase in width after a few rows) | 16 + 2 = 18 inches |
Chain a length as calculated above. Do not pull the chain too tight when you measure it. Keep it loose.
Count the number of stitches.
We want your total foundation chain to be a multiple of 4 stitches (divides evenly into 4). If it is not, add more chains to ensure your total chain ends on a multiple of 4 stitches.
Example: Our chest/bust measurement = 32 inches around and we have to chain 18 inches as per our calculation above. We reached 18 inches after chaining 79 chains. However 79 chains is not a multiple of 4. So we add one more chain to give a total of 80 chains to achieve a multiple of 4 (80 divided by 4 = 20 stitches ie. even number)
Add 2 more chains.
Example: After we chained 80 chains, we added 2 more chains, so the total number of chains in our foundation = 82 chains.
Row 1: 1sc in 2nd ch from hook, sc in every ch to end of row. Turn.
Row 2: ch6, sk 2st, 1sc in next st, *ch7, sk 3st, 1 sc in next st, rep from * to last 2 st, ch3, sk 1st, 1dc in last st. Turn
Row 3: ch1, 1sc in first dc, *ch3, 1sc in next ch-7sp, rep from * to end, sc in top tch. Turn.
Row 4: ch1, 1sc in first sc, *3sc in next ch-3sp, 1 sc in next sc, rep from * to end, sc in top tch. Turn
It’s a great time to do an intuitive check to see if you are completely happy with the width of the sweater before you crochet any further. You may want to hold it up against you after 4 rows of crochet to check the width of the sweater. If it’s perfect keep going. If you would like to make changes to the width, it is best to start again increasing or decreasing the number of chains that you originally used.
Row 5: repeat row 2
Row 6: repeat row 3
Row 7: repeat row 4
Row 8: repeat row 2
Row 9: repeat row 3
Row 10: repeat row 4
Row 11 – 12: ch1, 1sc in first sc, sc across the row until end. Turn
Repeat row 2-12 in that order until the back panel reaches a length equal to your “Finished length measurement” minus 1 inch. Try to finish on a row of sc such as row 4, 11 or 12.
Example: Our “Finished length measurement ” = 16 inches so we repeat row 2-12 until the length of the back panel reaches 15 inches.
Note that we were happy to follow the stripes as they came through on the self striping yarn. Sometimes we love that deconstructed slightly “off pattern look”. However if you want your stripes to be even and consistent, you will need to change the colours manually as you crochet the back panel.
Back Panel Neckline
We will now crochet the neckline.
Measure 4-6 inches (10-15 centimetres) in from the left edge of the panel and place a stitch marker. Repeat this on the right side of the panel.
If you would prefer a wider neckline, then reduce the number of inches you count in from each side. If you would prefer a tighter neckline, then increase the number of inches you count in.
Using the same working yarn on one side continue as follows:
Row 1: ch1, sc into the 1st st, sc in next st, sc across the row up to the stitch marker. Turn
Row 2: ch1, sc into the 1st st, sc in next st, sc across the row (away from the stitch marker). Turn
Repeat row 1 -2 in that order for 1 inch and so that your top now reaches the “Finished length measurement“.
Fasten off.
Repeat the neckline on the other side of the back panel.
Crochet the Main Front Panel
Repeat the Main Back Panel so that you end up with two identical panels.
If you are crocheting a consistent stripe effect, then you may want to follow the stripe pattern in the main body panel.
Crochet the Sleeves (Make 2)
We will crochet the sleeve panel first. Then if you choose to crochet the sleeve cuff and seam the cuff on to the sleeve panel (at assembly). You may like the look of wider boho sleeves and leave the cuff off.
Calculate the length of your foundation chain as follows:
| Take your “Armhole Depth Measurement“ and double it | Our armhole depth measurement = 6.5 inches Double it = 6.5 x 2 = 13 inches |
| Add 1 inch | 13 + 1 = 14 inches |
Chain a length as calculated above (we would chain 14 inches) and count the number of chains at the same time. Do not pull the chain too tight when you measure it. Keep it loose.
We want your total chain to be a multiple of 4. If it is not, add more chains to ensure your total number of chains ends on a multiple of 4 stitches.
Example: We had a to chain 14 inches based on our calculation above. We reached 14 inches after chaining 71 chains. However 71 chains is not a multiple of 4 so we add one more chain to give a total of 72 chains to achieve a multiple of 4 (72 divided by 4 = 18 stitches)
Add 2 more chains.
Example: After we chained 72 chains, we added 2 more chains, so the total number of chains in our foundation = 74 chains.
Row 1: 1sc in 2nd ch from hook, sc in every ch to end of row. Turn.
Row 2: ch6, sk 2st, 1sc in next st, *ch7, sk 3st, 1 sc in next st, rep from * to last 2 st, ch3, sk 1st, 1dc in last st. Turn
Row 3: ch1, 1sc in first dc, *ch3, 1sc in next ch-7sp, rep from * to end. Turn.
Row 4: ch1, 1sc in first sc, *3sc in next ch-3sp, 1 sc in next sc, rep from * to end. Turn
Repeat row 2-4 in that order until the sleeve panel reaches a length equal to your “Arm Length measurement” – 2 inches.
We will show you how to check the sleeve length again under “Assembly” below so that you can ensure you have the perfect fit.
Fasten off.
Remember to crochet 2 identical sleeves.
If you like the look of wider sleeves you can leave the cuff off.
Crochet the Sleeve Ribbing Cuff (Make 2)
The height of our sleeve ribbing is approximately 2-2.5 inches. Based on our gauge this is approximately 12 chains. However you can adjust the number of chains if you want to change the height of the ribbing or you are using a yarn with a different gauge.
ch 12
Row 1: 1 hdc in 3rd ch from hook, hdc in each ch across. Turn.
Row 2: ch2, hdc BLO in each st across. Turn.
Repeat row 2 until the sleeve ribbing cuff is equal to your “Wrist Circumference Measurement” + 1 inch and fits comfortably around your wrist.
Fasten off.
Remember to make two identical sleeve ribbing cuffs.
Assembling the Coral Bay Crochet Mesh Net Top
Kiks + Jack Crochet highly recommends blocking all your panels before assembly. Blocking your panels will set your panels to the shape and size you want and give it a professional look.
Step 1: Seam the Front and Back Panel at the shoulder.
Place the front and back panels together with the right sides facing together. With a yarn needle, seam the two panels together across the shoulders starting from the edge and up to the end of the neckline. Fasten off. Make sure you seam on both shoulders.
Step 2: Seam the ribbed cuffs to the sleeve. The sleeve panel is going to be much wider than the length of the cuff. This is correct and you will need to make sure the sleeve panel is evenly seamed to the cuff. To do this evenly, place 4 stitch markers at the 1/4 way mark of the length of the cuff, 1/2 way mark, 3/4 way mark and at the end of the cuff. Do the same with another 4 stitch markers on the beginning side of your sleeve panel. Connect the cuff to the sleeve (wrong side together) making sure that the 1/4, 1/2, 3/4 and ending stitch markers line up. You can even connect them together with the stitch markers. Using a yarn needle and matching yarn, seam the cuff to the sleeve, bunching the sleeve panel slightly to make sure it fits to the cuff and using the stitch markers to make sure its seamed evenly.
Do the same for the other cuff and sleeve.
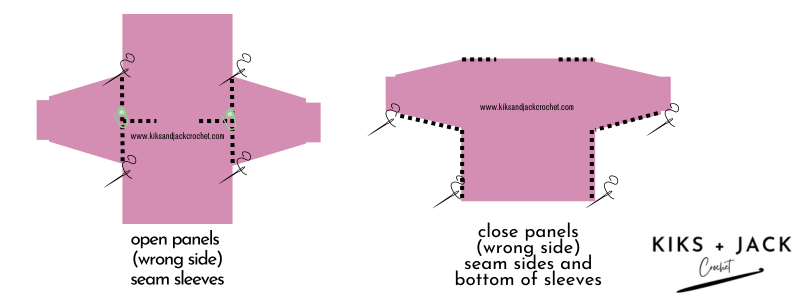
Step 3: Line up your sleeves at the midway point to the shoulder and seam. Open up the two panels (now seamed at the shoulders) so that the right side is facing the floor and the wrong side is facing upwards. Take one of your crocheted sleeves and fold it in half lengthways. Place a stitch marker at the top of your sleeve at the centre point. With the wrong side of the sleeve facing up, attach this stitch marker to the left edge of the left shoulder seam.
Do the same on the right side with the other sleeve.
Customization Tip: It is a good time to check the length of your sleeve. You can “seam” it with a few stitch markers to the main panel. Try it on.
If you would like the sleeve to be longer (eg. some like the length to be almost at the knuckles vs the wrist), you can add a few more rows on to your sleeve. You do this by unknotting your final knot when you fastened off at the end of the sleeve panel, attaching matching yarn and crocheting a few more rows. Or you can reduce rows if you like your sleeves shorter. You do this by unknotting your final knot when you fastened off and pulling out (frogging) the rows. Make sure you do the same on the second sleeve.
When everything is perfect, using a yarn needle and matching yarn, seam the sleeves to the main panels (wrong side facing up) – see first diagram below (for illustrative purposes only).
Step 4: Seam the sides of the sweater and the bottom of the sleeve together. Fold the two panels and sleeve panels at the seamed shoulders so that your sweater is facing wrong side out. With a yarn needle and matching yarn, seam the sides of the two panels together up to the armpit and along the bottom of the sleeve. See second diagram below (for illustrative purposes only).
Fasten off.
Finish & Celebrate for The Coral Bay Crochet Mesh Net Top
Weave in all your ends.
Congratulations you have finished The Coral Bay Crochet Mesh Net Top and we hope you enjoyed this free crochet pattern.
We are trying to keep all our crochet patterns free for everyone, when you access them online. We meet the costs of running this website through coffee donations at https://ko-fi.com/kiksandjackcrochet and ad revenue. When you buy us a cup of coffee, you buy us a cup of motivation. Thank you for keeping us motivated and inspired every day to keep designing free crochet patterns for you.
It would be amazing to see a photo of your completed work on instagram. Tag us @kiksandjackcrochet.
Follow us on social media to stay up to date with our free crochet patterns.


4 thought on “Coral Bay Crochet Mesh Net Top”
Comments are closed.