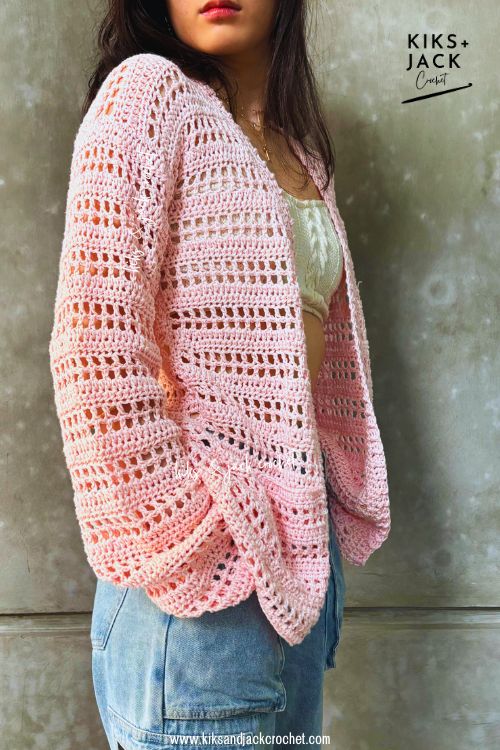
The Stella Flowy Mesh Crochet Cardigan is a free and easy crochet pattern that is made to measure, size inclusive and designed to be intuitive and beginner friendly. The full instructions are posted below for you to view for free.
We designed The Stella Flowy Mesh Crochet Cardigan because simply put, we want more lightweight garments in our wardrobe. Last year, we made lots of cozy sweaters and thick cardigans, and while we love them all, we realized we need more first-layer tops and easy throw-overs that work better with indoor heating in the colder months! Of course if you crochet this now in July, you will still get to wear it during cool summer nights and straight into early fall.
Support Our Work: We love being able to share all our crochet patterns for free, right here on our blog. But creating, maintaining, and growing this space takes time, resources, and a lot of love. If you would like to support what we do, you can buy us a coffee at ko-fi.com/kiksandjackcrochet. Every cup helps us stay inspired and allows us to continue offering “free to access” patterns to the community. Thank you for being here!
Right now in peak summer, we are styling The Stella Flowy Mesh Crochet Cardigan with denim shorts, and dresses. As we move into crisp fall, we will definitely be throwing this over loose jeans, long denim skirts and white tees. It’s the perfect transition piece, light enough for warmer days, but practical enough to wear indoors during winter. We recently released The Lovely Lightweight Lace Crochet Cardigan and it is one of our most accessed patterns! It tells us that our community has the same thing in mind too.
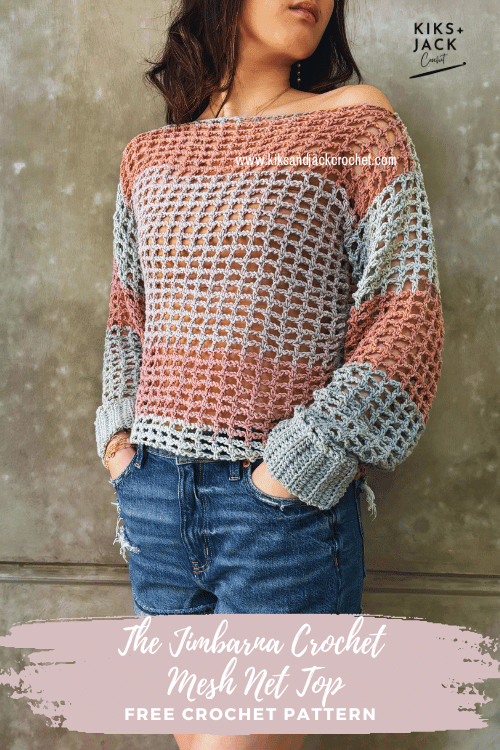
We have always loved the stitch pattern from the Jasper Easy Mesh Summer Top because it’s quick to work up, super beginner-friendly and looks great with minimal effort. It’s also really fun to crochet and one of those really rewarding stitches because it’s so fast…so it was great turning this design into a cardigan! We designed the sleeves to be long and oversized because we wanted to accommodate for a breezy fit in summer and a potential long sleeve first layer in the colder months.
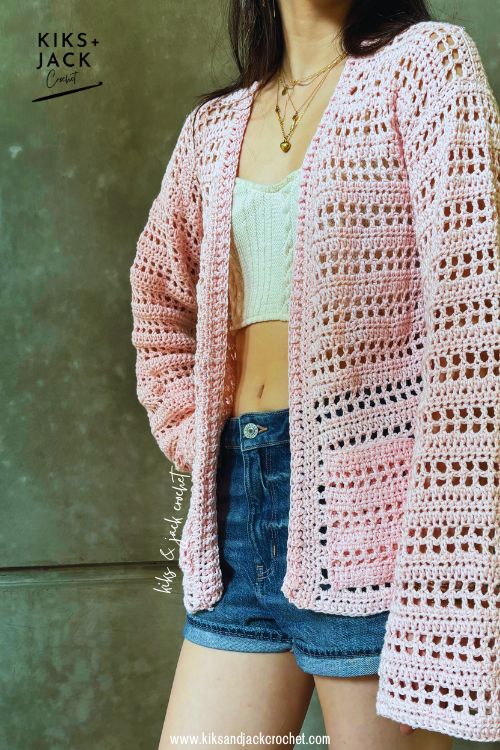
For our version of The Stella Flowy Mesh Crochet Cardigan, we used a cotton bamboo blend in a weight 3 yarn. It’s really soft, but it’s the drape that constantly leads us to this yarn. Whenever we use this, everything just ends up looking good because of the drape. We chose this particular shade of pink because we wanted something light, bright and not white. We like to think of it as a little unexpected while still staying wearable.
The pattern is made to measure, so you can make it in any yarn or fiber that suits your style. It’s one of the best ways to crochet garments because it gives you a perfect custom fit. You can find all the details in the section Crochet Materials found below including some great substitutions.
Ready to make your own Stella Flowy Mesh Crochet Cardigan? Grab your yarn and hook, and let’s begin. Don’t forget to tag us your progress in social media. We love seeing your makes and cheering you on. You can also follow us to stay in the loop with new patterns and updates. Just click on the icons below.
DESCRIPTION of The Stella Flowy Mesh Crochet Cardigan
The Stella Flowy Mesh Crochet Cardigan is an easy crochet cardigan pattern featuring long, loose oversized sleeves and a relaxed, square mesh stitch. Made using simple and beginner-friendly crochet stitches, it’s the perfect layering piece. This free crochet pattern is designed with positive ease to give it drape and movement. The neckline is simple and clean and we show you how to include cute little pockets.
This is a made to measure crochet cardigan, which means you can customize the length, width, and overall fit to suit your own body …. and like all our made to measure patterns, you don’t need to swatch our gauge exactly.
We used DK weight yarn (weight 3), which helps keep the cardigan flowy, and lightweight. We recommend using a yarn with good drape to highlight the open mesh texture.
CROCHET MEASUREMENTS & SIZES
The pattern instructions for The Stella Flowy Mesh Crochet Cardigan are made to measure, based on your required measurements.
Kiks + Jack Crochet will always try to write patterns that are “made to measure”. One of the best things about made to measure crochet patterns is that it celebrates the uniqueness of your body, something we all deserve from our handmade clothes. Unlike commercial sizing, which categorizes everyone into a limited range from XS to 5XL, made to measure patterns let you decide the fit based on your actual measurements. Every body is different, and we shouldn’t have to box ourselves to fit to a size chart. Let’s leave that to the big box stores. However if you would still like to use standard sizing we have listed them below for your convenience.
To crochet The Stella Flowy Mesh Crochet Cardigan you will need the following measurements and you should write them down for easy reference:
Chest/Bust: Measure around the fullest part of your chest/bust. Do not draw the tape too tightly.
Finished length: Measure from where you would like the cardigan to end up to the top of your shoulder. We designed our cardigan quite long near the hip level.
Arm Length: With arm slightly bent, measure from armpit to wrist (or where you would like the sleeve to end)
Armhole Depth: Measure from the top outside edge of the shoulder down to the armpit.
Standard Sizing (For Reference)
If you would like to use standard sizing for the chest/bust – then for XS (S, M , L, XL, 2XL, 3XL, 4XL, 5XL) use approximately 28-30 (32-34, 36-38, 40-42, 44-46, 48-50, 52-54, 56-58, 60-62) inches or 71-76 (81-86, 91-96, 102-107, 112-117, 122-127, 132-137, 142-147, 152-158) centimetres.
If you would like to use standard sizing for arm length – then for XS (S, M , L, XL, 2XL, 3XL, 4XL, 5XL) use approximately 16.5 (17, 17, 17.5, 17.5, 18, 18, 18.5, 18.5) inches or 42 (43, 43, 44.5, 44.5, 45.5, 45.5, 47, 47) centimetres
If you would like to use standard sizing for armhole depth – then use approximately 6-6.5 (6.5-7, 7-7.5, 7.5-8, 8-8.5, 8.5-9, 9-9.5, 9.5-10, 10-10.5) inches or 15.5-16.5 (16.5-17.5, 17.5-19, 19-20.5, 20.5-21.5, 21.5-23, 23-24, 24-25.5, 25.5-26.5) centimetres
Note: The Stella Flowy Mesh Crochet Cardigan is designed as an oversized fit with significant positive ease.
CROCHET GAUGE
The Stella Flowy Mesh Crochet Cardigan pattern is a made to measure pattern and therefore can accommodate different gauges however we recommend using a yarn weight and hook size similar to ours to achieve a similar effect. You do not need to swatch exactly.
This pattern is designed to drape so try to select a yarn that has great drape.
We used a 5mm crochet hook with a weight 3 yarn.
CROCHET MATERIALS for The Stella Flowy Mesh Crochet Cardigan
This section contains product affiliate links. We may receive a small commission (at no extra cost to you) if you make a purchase after clicking on one of these links.
Kiks + Jack Crochet promises to only recommend products that we love and that we use. Thank you for supporting us.
Yarn brand: Coboo by Lion Brand Yarn. Weight 3/DK/ Light Worsted. 100g skein and 232 yards (or 212m).
You can also purchase Coboo here and we always check this for great deals.
Kiks + Jack Crochet’s version has a finished width of approximately 18 inches and a finished length of 25 inches. We used approximately 4.6 skeins in total, or 1067 yards (or 975 m).
Other great substitutions to use for The Stella Flowy Mesh Crochet Cardigan include:
Cotton Fair by Premier Yarns. Weight 2/Fine/Sport
Acacia by Hobbii Yarn Weight 3/DK/Light Worsted
Softee Cotton by Bernat. Weight 3/DK/Light Worsted
Crochet Hook. We use many different crochet hooks and if you are looking for some great budget friendly ergonomic crochet hooks try these from Amazon. It comes in a set and the grip and the shape is amazing for beginner crocheters. We also love the slightly more pricey crochet hooks from Clover Crochet Hooks and the beautiful Furls Crochet Hooks (these are so stunning, we just love looking at them!)
Yarn Winder!!! (Our new LOVE). We have held off on a yarn winder for a long time. We love the idea of crochet being simple with just a hook and some yarn. However we decided to get this yarn winder, because it was affordable and we weren’t sure about investing in a super fancy one yet. We love it because it breathes life back into scrappy yarn lying around that looks messy. It’s simple to use and is holding up really well for us.
Measuring Tape. We use a super budget friendly measuring tape. Make sure it has cm and inches (not all patterns are written with both). We are always crocheting on the go so we like our tapes small and compact and we put one in our design area, one in our bag and one in our car. Retractable works best! We use these super cheap mini measuring tapes from Amazon
Stitch Markers. We use these locking crochet stitch markers from Amazon and these stitch markers that do not lock. They are cheap and colourful.
Blocking Pins. You should buy more pins than you think you need. If you are going to take the time to block don’t skimp on the pins. We like T shaped stainless steel pins that don’t rust when they get wet. We love these blocking T pins from Amazon and the tin means the pins don’t fall out on the floor.
Yarn Needle. Buy blunt needles with large eyes for yarn. We use these Yarn Needles because we like the convenient bottle, they are budget friendly and we get lots of them!
Scissors. We love these thread snippers because they are cheap, we get two of them AND they come with a case (some don’t). Don’t carry these without the case! After you use thread snippers you won’t want to snip with scissors.
CROCHET STITCHES & ABBREVIATIONS
The Stella Flowy Mesh Crochet Cardigan pattern uses US terms.
ch = chain (With one loop on your hook, yarn over and pull through the loop)
hdc = half double crochet (Yarn over and insert hook into desired stitch. Yarn over and pull through the stitch. You now have three loops on your hook. Yarn over and pull through all three loops)
dc = double crochet (Yarn over and insert hook into desired stitch. Yarn over and pull through the stitch. You now have three loops on your hook. Yarn over and pull through the first two loops. You now have two loops on your hook. Yarn over and pull through all two loops)
fpdc = front post double crochet (Yarn over and insert your hook from the front side to the back side of your work around the double crochet – the post – from the previous row, coming up on the opposite side of the stitch. Yarn over and pull up a loop. You will now have three loops on your hook. Yarn over and pull through the first two loops. You will now have two loops on your hook. Yarn over and pull through all two loops)
bpdc = back post double crochet (Yarn over and insert your hook from the back side to the front side of your work around the double crochet – the post – from the previous row, coming up on the opposite side of the stitch. Yarn over and pull up a loop. You will now have three loops on your hook. Yarn over and pull through the first two loops. You will now have two loops on your hook. Yarn over and pull through all two loops)
ch-1 sp = chain 1 space (eg. crochet into the space and not the stitch)
sl st = slip stitch
tch = turning chain
st = stitch
sk = skip stitch
* = repeat the instructions following the * as directed
Note unless stated otherwise turning chains do not count as a stitch if there are 1 or 2 chains and the turning chain does count as a stitch if there are 3 or 4 chains.
SUMMARY of CONSTRUCTION for The Stella Flowy Mesh Crochet Cardigan
To create The Stella Flowy Mesh Crochet Cardigan, you will begin by working up the main back panel, then we will crochet two front panels directly on to the main back panel and working down. This means the back panel and the two front panels will end up being one piece. Once the body is complete, you will crochet the sleeves separately, until you have reached your desired length and width. You will seam the pieces together, crochet and attach pockets and finish the neckline with a simple ribbing.
This is a made to measure crochet pattern, which means it can be easily adapted to suit your personal measurements and gauge.
PERMISSIONS AND COPYRIGHT
You may not publish or share any pattern on this website www.kiksandjackcrochet as your own including this pattern The Stella Flowy Mesh Crochet Cardigan. Except as permitted by the copyright law applicable to you, you may not reproduce or communicate any of the content on this website, including files downloadable from this website, without the permission of the copyright owner, Kiks + Jack Crochet.
You may not use any Kiks and Jack Crochet photo as your own photo.
You may crochet items to sell using The Stella Flowy Mesh Crochet Cardigan pattern upon permission by email at [email protected]. Please link back to this post in exchange.
PATTERN INSTRUCTIONS for The Stella Flowy Mesh Crochet Cardigan
Crochet the Main Back Panel
Chain a length that is equal to half your “Chest/Bust measurement“ PLUS 2-3 inches (depending on how oversized you would like the cardigan) AND is an ODD number of chains. Do not pull the chain too tight when you measure it.
Kiks + Jack Example: Our chest/bust measurement = 32 inches around and we want to add 2 inches of positive ease so we calculate: 32 inches/2 + 2 inches = 18 inches. So we chain up to 18 inches long which based on our gauge equals 69 chains. 69 is an odd number so we leave it as is (otherwise we would add one more chain to make it even).
Row 1: ch2, hdc in 3rd ch from hook, hdc in each ch across the row. Turn
Row 2: ch4 (from hereon counts as a st and a ch1), dc into the 3rd st, *ch1, sk next st, 1dc in next st, rep from * to end. Turn
Row 3: ch4, sk ch-1 sp, *1dc in next st (top of the dc), ch1, sk next st (the ch1), rep from * to end with dc in the top of the tch. Turn
Row 4: ch2 (from hereon counts as a st), *hdc in ch-1 sp, hdc in next st (top of the dc), rep from * to end finishing with a hdc in the top of the tch. Turn
Row 5: ch2, hdc in 2nd st, hdc in each st across the row, hdc in tch. Turn
This is a good time to check that you are happy with the width of your top. Sometimes the yarn stretches out more or less than you expect. Place it up against you after 5 rows of crochet and see if the width is right for you. If your yarn is more stretchy than expected and/or you want to reduce the width, we suggest you frog (unravel) and start again reducing the number of chains you originally crocheted. Or if you decide you want it more oversized and you want to increase the width we suggest you frog and start again increasing the number of chains. It’s better to get this width right at the start.
Continue repeating rows 2 – 5 in that order until your panel reaches your “Finished Length measurement“. Finish on a Row 4 or 5.
Do not fasten off.
Crochet the Front Panels (Make 2)
The front panels are crocheted directly on to the back panel (one at a time) so that the back panel and the two front panels are effectively one piece. ie. you will not need to seam them together.
Initially the front panels will be slightly narrower than the back panel to allow for shaping around the neckline. We will slowly increase the width of the front panels as they get longer. They will eventually be almost the same width as the back panel (a little less to accommodate for the ribbing).
Lets start by marking out the initial width of the front panels.
| Calculation | Kiks+Jack Crochet Example |
| Measure the width of your back panel. How wide is it? | Our back panel is 18 inches wide |
| Measurement A (top of front panel): Divide by 2 and then multiply by 0.75 | 18 inches/2 = 9 inches 9 inches x 0.75 = 6.75 inches |
| Measurement B (widest part of front panel): Divide by 2 and then multiply by 0.9 | 18 inches/2 = 9 inches 9 inches x 0.9 = 8.1 inches |
Kiks + Jack’s Example: Our front panel at the top will start at approximately 6.75 inches wide (Measurement A) and we will expand the front panel to approximately 8.1 inches wide (Measurement B)
Take your back panel and a measuring tape. Measure out “Measurement A” from the top left side of your back panel towards the centre and place a stitch marker (remember, you should have just finished a Row 4 or 5). Do the same on the right side. In our version, Kiks + Jack would measure out 6.75 inches on both sides of the back panel.
Pick up the working chain. We will now start crocheting the first front panel.
Important Note: in Row 1 below, you need to crochet an odd number of stitches. You should count your hdc stitches as you crochet and when you reach the stitch with the SM if you do not end on an odd number then crochet one more stitch.
Row 1 (heading towards the SM and count your stitches): ch2 (remember it counts as a st), hdc in 2nd st, hdc in each st across the row ending with an hdc in the stitch with SM (see important note above). Turn
Row 2 (heading towards the edge): ch2, hdc in 2nd st, hdc in each st across the row ending with an hdc in top of tch. Turn
Row 3: ch4, dc into the 3rd st, *ch1, sk next st, 1dc in next st, rep from * to end. Turn
Tip: In the next few rows 4-6 we used stitch markers to mark out the start and end of rows (eg. after starting chains and at the last stitch). It was helpful to see exactly where the first and last stitch was, especially in expanding rows 5 -6.
Row 4: ch4, sk ch-1 sp, *1dc in next st (top of the dc), ch1, sk next st, rep from * to end with dc in the top of the tch. Turn
Row 5 (Expanding): ch2, *hdc in ch-1 sp, hdc in next st (top of the dc), rep from * to end finishing with 2hdc in the top of the tch. Turn
Row 6 (Expanding): ch2, hdc in 1st st, hdc in next st, 1hdc in each st across the row, hdc in tch. Turn
Row 7: repeat row 3
Row 8: repeat row 4
Continue repeating rows 5-8 in that order, expanding the front panel until the width of your front panel reaches Measurement B (in Kiks + Jack’s example that would be approximately 8.1 inches – we reached this measurement a little lower than our armpit – however it will depend on your gauge and your measurements).
At this point do not crochet expanding rows 5-6 anymore and instead replace them with regular rows as follows (the double crochet mesh stitch rows stay as per normal):
Regular Row 5: ch2, *hdc in ch-1 sp, hdc in next st (top of the dc), rep from * to end finishing with a hdc in the top of the tch. Turn
Regular Row 6: ch2, hdc in 2nd st, hdc in each st across the row, hdc in tch. Turn
Continue to crochet this until your front panel reaches the same length as your back panel. End on an hdc row as it looks neater.
Fasten off.
Repeat the same process on the other side so that you have two front panels (with shaping around the neckline crocheted directly on to the back panel).
Crochet the Sleeve Panel (Make 2)
We will now crochet the two sleeve panels. These sleeves are designed to be wide, long and oversized.
Calculate the length of your foundation chain as follows:
| Take your “Armhole Depth Measurement” and double it. | Our armhole depth measurement is 6.5 inches. Doubling it = 13 inches. |
| Add an 1-2 inches for positive ease. | 13 + 1 = 14 inches. |
Optional Sleeve Width Adjustment: If your upper arm circumference (eg bicep) is bigger than 2 x your armhole depth measurement you can use your upper arm circumference instead. Every arm shape is different and you effectively want to use the widest part of your arm for your calculation.
Chain a length as calculated above and count the stitches at the same time. Do not pull the chain too tight when you measure it. Keep it loose.
You need your total number of stitches to be an odd number. If it is not an odd number then add one more chain.
Row 1: ch2, hdc in 3rd ch from hook, hdc in each ch across the row. Turn
Row 2: ch4, dc into the 3rd st, *ch1, sk next st, 1dc in next st, rep from * to end. Turn
Row 3: ch4, sk ch-1 sp, *1dc in next st (top of the dc), ch1, sk next st, rep from * to end with dc in the top of the tch. Turn
Row 4: ch2, *hdc in ch-1 sp, hdc in next st (top of the dc), rep from * to end finishing with a hdc in the top of the tch. Turn
Row 5: ch2, hdc in 2nd st, hdc in each st across the row, hdc in tch. Turn
Continue repeating rows 2 – 5 in that order until your panel reaches your “Arm Length Measurement“. Finish on an hdc row. You can also put the main panel on and roughly attach your sleeve to double check you are happy with the length. Crochet a few more rows if you want it longer and frog a few rows if you want it shorter.
Fasten off.
Remember you need to crochet two identical sleeve panels.
Assembling The Stella Flowy Mesh Crochet Cardigan
At Kiks + Jack Crochet, we always recommend blocking your panels before seaming. It helps set the shape and size of each piece, giving your finished cardigan a clean, polished look. We like to use lots and lots of blocking pins and pin our panels onto an old yoga mat, then give them a thorough spray and let them dry fully before assembling.
Step 1: Line up your sleeves at the midway point to the shoulder and seam.
Lay the main body panel flat with the right side facing down and the wrong side facing up. Arrange both front panels and the back panel neatly. Take one sleeve and fold it in half lengthwise to find the center. Mark the center point with a stitch marker. With the wrong side of the sleeve facing up, align the stitch marker with the outer edge of the left shoulder seam and secure it in place.
Using a yarn needle and matching yarn, sew the sleeve to the main body panel along the armhole edge.
Repeat the same process on the right side with the second sleeve.
Step 2: Seam the sides of the cardigan and the bottom of the sleeve together.
Fold the main panels and sleeve panels so that your cardigan is facing wrong side out. Using a yarn needle and matching yarn, join the front and back panels together along the sides, stopping at the underarm. Then continue seaming along the underside of the sleeve to finish.
Step 3: Add the ribbing to the neckline
We used a smaller hook size for the neckline ie. 4.5mm.
Turn the cardigan right side out. Attach a yarn to the side of the neckline.
Row 1: ch1 (does not count as a st), sc in 1st st, sc evenly around the neckline into every st. You can crochet 2sc in large spaces and 1sc in regular stitches. The key is to keep the sc even. Turn
Row 2: ch2 (does not count as a st), hdc in 1st st, hdc around the neckline into every st until you reach the other end. Turn
Row 3: ch3, dc in 2nd st, dc around into every st until you reach the other side
Row 4: ch3, *fpdc, bpdc, rep from * until end of the row.
Go back up to the section Kiks + Jack Crochet Crochet Stitches & Abbreviations for instructions on how to crochet Front Post Double Crochet (fpdc) and Back Post Double Crochet (bpdc).
Fasten off.
Step 4: Crochet and Attach Pockets
Chain a length that is equal to your desired pocket width. Make sure you end on an odd number.
Kiks + Jack chained 19 and it gave us relatively smaller pockets.
Follow the standard mesh pattern from the main back panel until you reach your desired pocket length. We crocheted 14 rows and our total pocket dimensions are approximately 5 inches x 5 inches. Try to end on an hdc row for a neater look.
Use matching yarn and a yarn needle and seam the pockets on each side making sure it’s even.
Finish & Celebrate The Stella Flowy Mesh Crochet Cardigan
Weave in all your ends.
Congratulations you have finished The Stella Flowy Mesh Crochet Cardigan and we hope you enjoyed this free crochet pattern.
Please support us: We hope you loved making this crochet piece as much as we loved designing it. If you would like to support our work and help us keep patterns like this “free to access”, please consider buying us a coffee at ko-fi.com/kiksandjackcrochet. Your support means the world to us and it helps us cover website costs and keeps the free crochet patterns coming. Thank you for being part of our community and supporting us.
It would be amazing to see a photo of your version of The Stella Flowy Mesh Crochet Cardigan on Instagram. Tag us @kiksandjackcrochet. We would love for you to follow us on social media by clicking the links below to see new pattern releases and our designs in progress.
