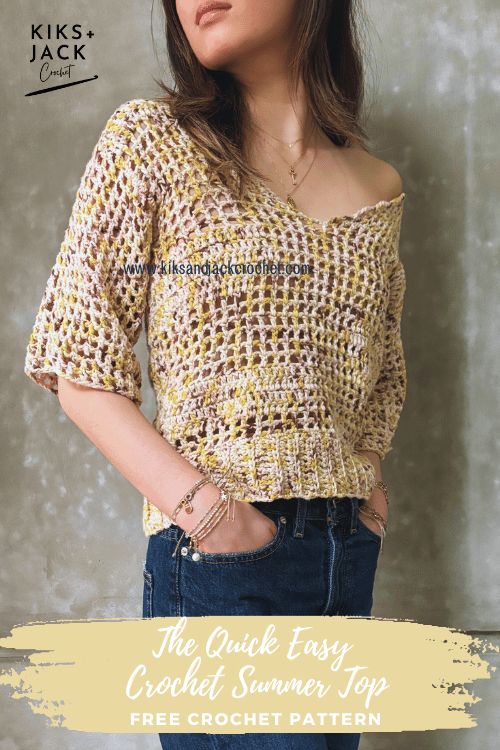
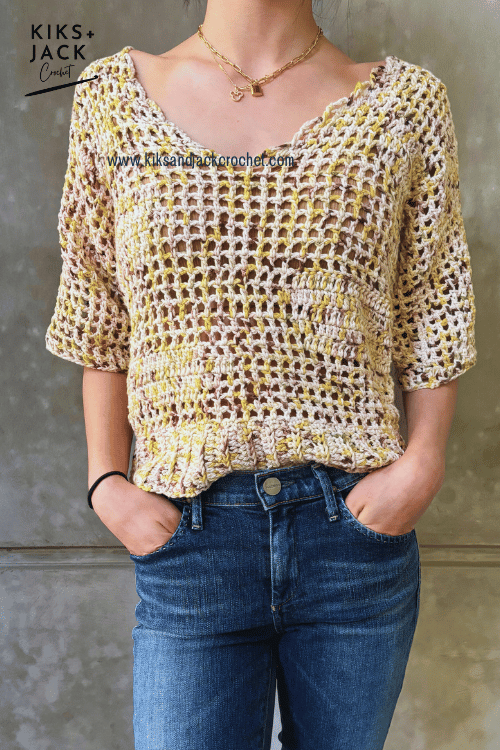
The Quick Easy Summer Mesh Crochet Top is a free crochet pattern that is made to measure, size inclusive and designed to be intuitive and beginner friendly.
If you have spent some time on our crochet blog, you will probably know that we love crochet mesh tops. It is what kickstarted this blog! We wanted to share all these mesh crochet patterns that are so perfect for beginners!!
Why are mesh crochet tops a great place for beginners to start with?
They flatter all body types because they have beautiful drape.
They look modern and elegant over a tank (even better if the tank is crocheted like The Manley Striped Fitted Crochet Top) and can look cute worn over a bralette (like The Mangolia Lacy Crochet Bra Top).
They tend to use stitches that are FAST! Which means you complete a project fast….and thats always important for beginners. Watching your crocheted wearable fall off your crochet hook quickly is super motivational.
They tend to use easy stitches that are perfect for beginners. It’s so much fun to use combinations of the basic single, half double and double crochet stitches to create a completely different look.
They are forgiving if you make a mistake. Let’s be honest, we all make crochet mistakes (especially when we are watching Netflix at the same time ha ha). Due to the drape and airy nature of a mesh stitch, it’s a lot harder to see a mistake compared to a tight single crochet stitch.
We are trying to keep all our crochet patterns free for everyone, when you access them online. We meet the costs of running this website through coffee donations at https://ko-fi.com/kiksandjackcrochet and ad revenue. When you buy us a cup of coffee, you buy us a cup of motivation. Thank you for keeping us motivated and inspired every day to keep designing free crochet patterns for you.
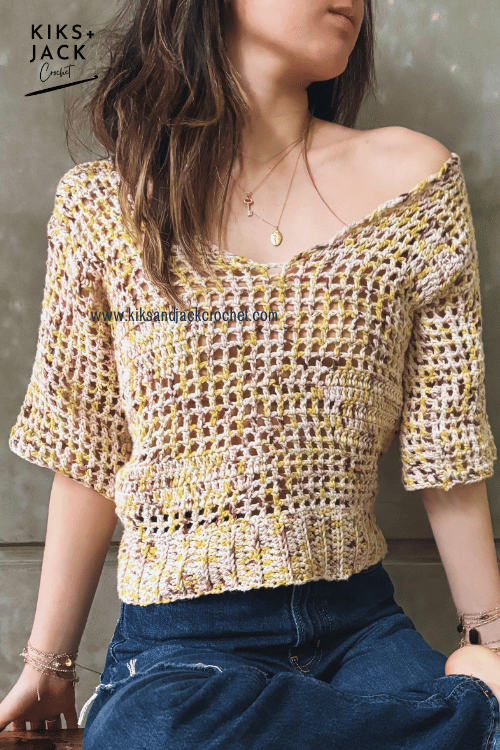
We love the detailing on The Quick Easy Summer Mesh Crochet Top where we crocheted solid patches on the top to contrast with the mesh. We think it makes the top unique, slightly deconstructed and completely original. If you would prefer to leave them out, it’s easy. We will show you how!
We used a beautiful, soft and speckled yellow yarn from Lion Brand Yarn. Its so smooth to crochet with, and so soft to wear! It also gives beautiful drape! You can find all the details in the section “Crochet Materials” below along with some great substitutions.
So, let’s get started on The Quick Easy Summer Mesh Crochet Top. If you tag us on Instagram @kiksandjackcrochet your work in progress we promise to cheer you on!
DESCRIPTION for The Quick Easy Summer Mesh Crochet Top
The Quick Easy Summer Mesh Crochet Top is a modern, mesh crochet top that is perfect for spring and summer but also can be worn right through fall. The basic design uses an easy mesh stitch, with random deconstructed solid stitching throughout the panels. These can all be customized.
It features mid sleeves and a easy raw V neckline. The sleeves are crocheted directly on the front and back panels after they have been seamed.
This is a free and easy crochet pattern that is made to measure, intuitive and written specifically for beginners.
CROCHET MEASUREMENTS & SIZES
The Quick Easy Summer Mesh Crochet Top pattern instructions are made to measure, based on your required measurements.
Kiks + Jack Crochet will always try to write patterns that are “made to measure” (versus graded sized patterns) so that crocheters can get the wonderful benefits of making a garment that fits perfectly. However we do appreciate taking measurements can be inconvenient for some and have also provided standard measurements for those who wish to use it.
To use this pattern you will need the following measurements and you should write them down for easy reference:
Chest/Bust: Measure around the fullest part of your chest/bust. Do not draw the tape too tightly.
Finished length: Measure from top of your shoulder towards your waistline and stop where you would like this crochet top to end. We designed ours to hit slightly above the hips.
Length to armpit: Measure from where you would like the top to end up to bottom of your armpit
Arm to Below Elbow Length: Measure from armpit to just below your elbow (or where you would like the sleeve to end)
Armhole Depth: Measure from the top outside edge of the shoulder down to the armpit
If you would like to use standard sizing for the chest/bust – then for XS (S, M , L, XL, 2XL, 3XL, 4XL, 5XL) use approximately 28-30 (32-34, 36-38, 40-42, 44-46, 48-50, 52-54, 56-58, 60-62) inches or 71-76 (81-86, 91-96, 102-107, 112-117, 122-127, 132-137, 142-147, 152-158) centimetres.
If you would like to use standard sizing for armhole depth – then use approximately 6-6.5 (6.5-7, 7-7.5, 7.5-8, 8-8.5, 8.5-9, 9-9.5, 9.5-10, 10-10.5) inches or 15.5-16.5, 16.5-17.5, 17.5-19, 19-20.5, 20.5-21.5, 21.5-23, 23-24, 24-25.5, 25.5-26.5) centimetres
Note: The Quick Easy Summer Mesh Crochet Top is designed as a classic fit with some positive ease.
CROCHET GAUGE
Using a 4.5mm crochet hook, approximately 16 stitches and 8 rows of half double crochet in 4″ x 4″ (10 cm x 10 cm).
Note The Quick Easy Summer Mesh Crochet Top pattern is made to measure and can accommodate for different crochet gauges. However you should select a yarn with a similar gauge to this version.
CROCHET MATERIALS for The Quick Easy Summer Mesh Crochet Top
This section contains product affiliate links. We may receive a small commission (at no extra cost to you) if you make a purchase after clicking on one of these links.
We promise to only recommend products that we love and that we use. Thank you for supporting our small business.
Yarn brand: Pima Cotton by Lion Brand Yarns. Weight 4/Medium/Worsted. 85g skein and 157 yards (or 144 m).
Approximately 3.8 skeins or 591 yards (or 547m) used for our garment (approximately XS) with a finished width of 17 inches and a finished length of 18 inches.
Here are some other great yarns that we would love to use with this pattern:
Truboo by Lion Brand Yarn: this yarn will give a lot more drape than a pima cotton
Alize Diva Silky Effect: super affordable and lots of colours
4.5 mm crochet hook (US size 7). We use many different crochet hooks and if you are looking for some great budget friendly ergonomic crochet hooks try these from Amazon. It comes in a set and the grip and the shape is amazing for beginner crocheters. However our absolute favourite, slightly more pricey crochet hooks are clover crochet hooks. You can buy then in a set or individually.
Measuring Tape. We use a super budget friendly measuring tape. Make sure it has cm and inches (not all patterns are written with both). We are always crocheting on the go so we like our tapes small and compact and we put one in our design area, one in our bag and one in our car. Retractable works best! We use these super cheap mini measuring tapes from Amazon.
Stitch Markers. We use these locking crochet stitch markers from Amazon and these stitch markers that do not lock. They are cheap and colourful.
Blocking Pins. You should buy more pins than you think you need. If you are going to take the time to block don’t skimp on the pins. We like T shaped stainless steel pins that don’t rust when they get wet. We love these blocking T pins from Amazon and the tin means the pins don’t fall out on the floor.
Yarn Needle. Buy blunt needles with large eyes for yarn. We use these Yarn Needles because we like the convenient bottle, they are budget friendly and we get lots of them!
Scissors. We love these thread snippers because they are cheap, we get two of them AND they come with a case (some don’t). Don’t carry these without the case! After you use thread snippers you won’t want to snip with scissors.
CROCHET STITCHES & ABBREVIATIONS
The Quick Easy Summer Mesh Crochet Top pattern uses US terms.
ch = chain (With one loop on your hook, yarn over and pull through the loop)
hdc = half double crochet (Yarn over and insert hook into desired stitch. Yarn over and pull through the stitch. You now have three loops on your hook. Yarn over and pull through all three loops)
dc = double crochet (Yarn over and insert hook into desired stitch. Yarn over and pull through the stitch. You now have three loops on your hook. Yarn over and pull through the first two loops. You now have two loops on your hook. Yarn over and pull through all two loops)
ch-1 sp = chain 1 space (eg. crochet into the space and not the stitch)
BLO = back loop only
sl st = slip stitch
tch = turning chain
st = stitch
sk = skip stitch
* = repeat the instructions following the * as directed
Note unless stated otherwise turning chains do not count as a stitch if there are 1 or 2 chains and the turning chain does count as a stitch if there are 3 or 4 chains.
SUMMARY of CONSTRUCTION for The Quick Easy Summer Mesh Crochet Top
The Quick Easy Summer Mesh Crochet Top is made by crocheting two identical panels. We will first crochet a back panel and then a front panel. Each panel will be crocheted bottom up starting with the ribbing. For the front panel we will crochet a V neckline. We will seam the two panels together and then crochet the mid length sleeves directly on. We have left the neckline edge raw.
The stitch pattern is the mesh stitch and a random double crochet design. This double crochet design can be customized or removed from the top.
PERMISSIONS AND COPYRIGHT
You may not publish or share any pattern on this website www.kiksandjackcrochet as your own including this pattern The Quick Easy Summer Mesh Crochet Top. Except as permitted by the copyright law applicable to you, you may not reproduce or communicate any of the content on this website, including files downloadable from this website, without the permission of the copyright owner, Kiks + Jack Crochet.
You may not use any Kiks and Jack Crochet photo as your own photo.
You may crochet items to sell using The Quick Easy Summer Mesh Crochet Top pattern upon permission by email at [email protected]. Please link back to this post in exchange.
PATTERN INSTRUCTIONS for The Quick Easy Summer Mesh Crochet Top
Crochet the Front Panel Ribbing
ch 12
The height of Kiks + Jack Crochet ribbing is just over 2 inches. Based on our gauge this is 12 chains. If your gauge is different to ours, the height of your ribbing may be slightly different.
Row 1: hdc in 3rd ch from hook, hdc in each ch across until end. Turn
Row 2: ch2, hdc BLO in each st across. On the last st, hdc into the whole st. Turn
Repeat row 2 until the total length of the ribbing is equal to HALF of your “Chest/Bust Measurement” + 1 to 2 inches.
Kiks + Jack Crochet example: Our chest/bust measurement = 32 inches around. Half of 32 inches = 16 inches. We keep repeating row 2 until the total length of the ribbing reaches 17 inches (16 + 1 = 17 inches)
Count the total number of rows.
Kiks + Jack Crochet example: We counted a total of 34 rows to achieve a length of 17 inches.
It’s a great time to check if you are completely happy with the width of the sweater before you crochet any further. Place the ribbing up against you to see if the width (length of ribbing) is right for you. If you would like it to be wider, crochet a few more rows. If you would like the ribbing to be tighter, then you can frog (unravel) a few rows.
Do not fasten off.
Crochet the Front Panel
You will now crochet down the long side of the ribbing that you just crocheted.
To calculate the number of stitches that you will crochet down the long side of the ribbing, calculate as follows:
| Calculation | Kiks + Jack Crochet Example |
| Count the number of rows in your ribbing | We have 34 rows in our ribbing (to achieve 17 inches) |
| Multiply this by 1.5 | 34 X 1.5 = 51 stitches |
| If it is an odd number, keep as is. Otherwise add one more. | 51 is an odd number so we leave as is. |
Row 1: Using the working yarn, ch1, sc into the first st, sc across the ribbing the number of stitches you calculated above in total. Turn
In Kiks + Jack Crochet example above we will crochet 51 single crochets across the long side ribbing. You may want to place stitch markers at the 1/4, 1/2 and 3/4 way mark down your ribbing, to help ensure you crochet evenly.
Row 2: ch 4, dc into the 3rd st, *ch1, sk next st, 1dc in next st, rep from * to end. Turn
Row 3: ch 4, sk ch-1 sp, *1dc in next st (top of the dc), ch1, sk next st, rep from * to end with dc in the top of the tch. Turn
Kiks + Jack Crochet Tip: you are crocheting a dc into the top of each dc from the previous row creating mesh squares one on top of each other
If you do not want any solid sections then crochet row 3 until your top including the ribbing reaches the “Length to armpit measurement”. Move to the section below “Crocheting the V Neck on the Front Panel”.
If you do want solid sections then continue in the next section “Plan Out and Crochet Your Solid DC Sections” below.
Do not fasten off.
Plan Out and Crochet Your Solid DC Sections
Here is the fun part! You get to design your own deconstructed solid sections on your mesh top. These are the solid patches you see that are randomly placed and are in varying sizes and shapes on the front of the top.
The solid sections are double crochet stitches instead of the mesh stitch. The double crochet stitches will give a solid pattern that contrasts with the mesh stitch.
The most important thing to remember is that the double crochet stitch needs to end on the corner of a square and not in the middle of the square.
Here are the instructions for our first solid dc section and you may want to copy our design for this first solid section. After this you can design and add your own sections.
Row 4: ch3 (counts as a st), *dc in ch-1 sp, dc in next st (top of the dc), rep from * for 21 stitches (make sure you finish on the end of a square and not in the middle of a square), ch1, sk1, **1dc in next st, ch1, sk next st, rep from ** to end with dc in the top of the tch. Turn
Kiks + Jack Crochet Note: feel free to double crochet in more or less than 21 stitches. Pick a number of stitches that looks good in relation to the length of your top and your own personal preference. Just remember to finish the last double crochet on the end of a square and not in the middle of the square.
Row 5: ch 4, sk ch-1 sp, *1dc in next st (top of the dc), ch1, sk next st, rep from * until there are (approx) 25 stitches remaining (or a few stitches before you reach your solid dc patch), **dc in ch-1 sp, dc in next st (top of the dc), rep from ** until you reach the solid dc patch, then dc across to the end. Turn
Row 6: ch3 (counts as a st), dc across the solid patch below (in our example it is for 25 stitches) *dc in ch-1 sp, dc in next st (top of the dc), (make sure you finish on the end of a square and not in the middle of a square), ch1, sk1, **1dc in next st, ch1, sk next st, rep from ** to end with dc in the top of the tch. Turn
Row 7: ch 4, sk ch-1 sp, *1dc in next st (top of the dc), ch1, sk next st, rep from * until you reach the solid patch, continue the mesh st over the solid patch for 4 more st, then dc in every st towards the end. Turn.
From here you can repeat Row 2 to return to a regular mesh row.
You should be able to see the solid dc sections form on one side of the top. Our solid dc sections are uneven, of varying lengths and widths and appear randomly. We have 3 larger solid dc sections on the main front panel and then 2 smaller solid dc sections closer at the top around the V neck. Here is the photo again so that you can see our design.
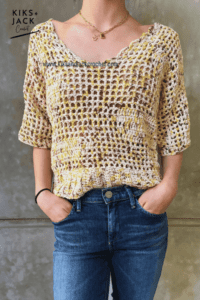
Now that you know how to add a deconstructed solid dc section into your panel you can design your own placement!
Crochet row 3 and your solid dc sections until the length of your top including the ribbing reaches the “Length to armpit measurement”.
Do not fasten off.
Crocheting the V Neck on the Front Panel
At this point we are now going to start crocheting the V neck.
Using a tape measure, find the halfway centre point of your top. Place a stitch marker in the middle of the centre square.
Kiks + Jack Crochet Tip: Don’t forget if you are going to add solid dc sections, you may want to add small dc sections on each side of the V neck. We added a small dc section on each side of the V neck.
Kiks + Jack Crochet Tip: To help you understand how the V neck works for this top, think of it as you will be “reducing one square” in every row heading towards the centre. However, in every row moving away from the centre you will not reduce a square, but crochet a regular row.
Using the same working yarn:
Row 1: ch 4, sk ch-1 sp, *1dc in next st (top of the dc), ch1, sk next st, rep from * towards the centre stitch marker. End with dc in the st before the stitch marker (ie. the corner of the square with the stitch maker). Turn
Row 2: ch 4, sk ch-1 sp, 1dc in next st (top of the dc and place a stitch marker), *ch1, sk next st, 1dc in next st, rep from * to end with dc in the top of the tch. Turn
Row 3: ch 4, sk ch-1 sp, *1dc in next st (top of the dc), ch1, sk next st, rep from * towards the stitch marker. End with a dc in the st with a stitch marker. Turn
Repeat rows 2 -3 in that order until the total length of your top including the ribbing is equal to your “Finished Length Measurement“. Fasten off.
Remember to incorporate a small solid dc section if you want to. Start from the edge of your top (versus the centre).
Kiks + Jack Crochet Tip: We like to keep checking the V neck against us as we crochet it. If you want to narrow the V neck towards the end, you can crochet a few regular rows. To do this, then in Row 3 you end with a dc in the turning chain instead of the stitch marker.
You have now finished the V neck on one side. The edge of the V neck should give a cute little frill from the chain 4s.
Attach a matching yarn on the other side of the front panel at the edge. Repeat all the instructions to crochet a matching V neck slant on the other side.
Remember to incorporate another small solid dc section if you want to.
Fasten off.
Crochet the Back Panel Ribbing
Repeat all the instructions in the section “Crochet the Front Panel Ribbing” above.
Crochet the Back Panel
Repeat all the instructions in “Crochet the Front Panel” section except you will not crochet the V neck. Instead you will keep crocheting until the total length of your back panel including the ribbing is equal to your “Finished Length Measurement“. Check it against the length of your Front Panel to make sure it is the same length.
Remember to incorporate random solid dc sections if you choose to. For our version we did not crochet solid dc sections in the back panel.
ASSEMBLING the Quick Easy Summer Mesh Crochet Top
Kiks + Jack Crochet highly recommends blocking your two panels before assembling the Quick Easy Summer Mesh Crochet Top. Blocking your panels will set your panels to an even shape and size.
Kiks + Jack Crochet block our panels by pinning all the pieces on to an old yoga mat and manipulating the shape and edges so the front and back panel are similar. We then spray it with water focusing on the edges and ensuring it is well saturated. Do not remove the pins until the panels are completely bone dry.
Step 1: Seam the Front and Back Panel at the shoulder.
Place the front and back panels together with the right sides facing together. With a yarn needle, seam the two panels together across the shoulders starting from the edge and across the top.
Fasten off.
Step 2: Seam the Sides Together
Measure from the top of the sweater and down the side, your “Armhole Depth Measurement” + 2 inches and place a stitch marker through both panels. Do the same on the other side.
For example, Kiks + Jack Crochet’s armhole depth measurement is equal to 7 inches so we measure 9 inches (7 + 2 = 9 inches) from the top of the sweater down the side and place a stitch marker through both panels. This will be the bottom of the sleeve opening.
Kiks + Jack Crochet Tip: Try it on and see if you are comfortable with the arm opening. We suggest you give a generous arm opening for this stitch pattern. Adjust the stitch markers if necessary and make sure it is even on both sides.
Double check the panels are facing wrong side up (right sides together). With a yarn needle and matching yarn, seam the two panels together from the bottom up to the stitch markers on both sides.
Crochet the Left Sleeve
Turn your top right way out.
Starting with the left sleeve, attach your yarn at the armpit. You will now crochet the sleeve directly on the sweater.
Round 1: ch1 (place a stitch marker in this ch), sc evenly around the sleeve counting your stitches at the same time. Sc into stitches and spaces and if a space is large you may need to sc twice into the space. Slip st to join to the tch (with stitch maker). End with an odd number.
Round 2: ch 4 (place a stitch marker in the ch3), sk st, dc into 3rd st, *ch1, sk next st, 1dc in next st, rep from * to end of round, join by ch1, sl st to stitch marker.
Round 3: ch 4 (place a stitch marker in the ch3), sk ch-1 sp, *1dc in next st (top of the dc), ch1, sk next st, rep from * to end of round, join by ch1, sl st to stitch marker.
Kiks + Jack Crochet Tip: You may want to try it on after 4 rounds. Have you measured enough space under your arm? Do you like how tight or loose the sleeve is? If it doesn’t feel perfect you may need to do some frogging, but it’s better to try it on now and get it right before you keep going.
Repeat round 3 until you reach the “Arm to Below Elbow Length Measurement“. Once again, try it on and test out the length.
Fasten off.
Crochet the Right Sleeve
Repeat all the instructions for the left sleeve on the right so that the two sleeves are identical width and lengths.
Finish & Celebrate the Quick Easy Summer Mesh Crochet Top
Weave in all your ends.
Congratulations you have finished the Quick Easy Summer Mesh Crochet Top and we hope you enjoyed this free crochet pattern.
We are trying to keep all our crochet patterns free for everyone, when you access them online. We meet the costs of running this website through coffee donations at https://ko-fi.com/kiksandjackcrochet and ad revenue. When you buy us a cup of coffee, you buy us a cup of motivation. Thank you for keeping us motivated and inspired every day to keep designing free crochet patterns for you.
It would be amazing to see a photo of your version of Quick Easy Summer Mesh Crochet Top on instagram. Tag us @kiksandjackcrochet.
Follow us on Pinterest, Instagram or Facebook for new pattern releases by clicking on the icons below:
