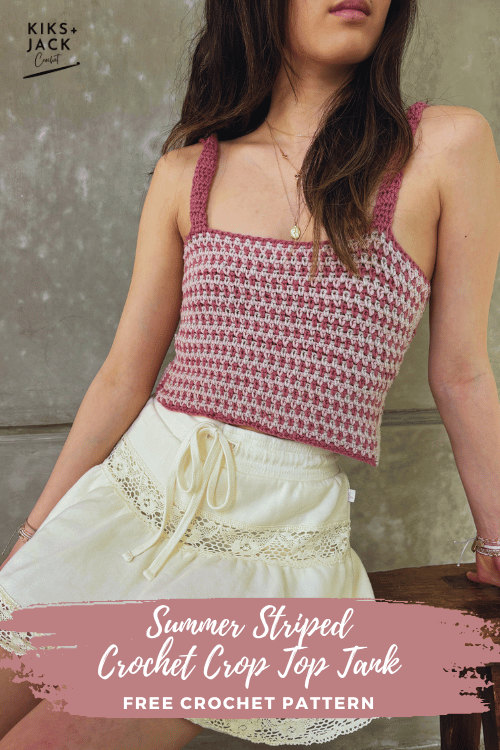
The Cottesloe Beach Waves Crochet Crop Top is a free pattern below.
This top is a great staple clothing piece. Its so rewarding to crochet and design simple garments that you know you will wear all the time. Crocheting your own will mean your top is unique, made with love and supporting slow fashion. If you wear it all the time, it will be worth every single minute you spent on it!
One of the things that is so great about crochet is the large number of different stitches. It’s so exciting to learn a new stitch and then watch it develop over the rows. It’s so fun to engage in the creative process of playing around with different combinations of crochet stitches and changing the order of rows and watching how it can totally change the look of your garment!

Changing up the stitches isn’t always perceived as “beginner friendly”, but crocheting pieces that keep you engaged, interested and are fast to finish is also important for beginners! Changing up the stitch pattern in a piece will keep you motivated and excited to crochet on! For this cotton crochet crop top, we used four different stitch patterns, however they are all very simple. We wanted that beautiful “stringy” crochet look to remind you of the beach and its wonderful waves.
If this top is too cropped, it’s easy to make it longer and this free crochet pattern will show you how in the instructions below. Adding a few more rows is easy and you can turn this cropped top into a super cool, long, white singlet top. Add a few more rows (or a lot more rows) and you turn it into a cute summer dress.
Styling this white crochet crop top? It goes with everything! Jeans, shorts, long skirts and short skirts. Try wearing it with the Manley Striped Crochet Fitted Skirt – they both use the same yarn! For the Manley Striped Crochet Fitted Skirt we used a yellow and white striped design. Consider crocheting the skirt in a solid white, wear it with this top and you would have a very cute two piece outfit.
When the weather gets a little chilly, team it with a warm cardigan – crocheted of course.

We wanted a fitted top for this pattern so we used a favourite stretchy cotton yarns. The Capri Cotton yarn from Loops & Threads is 57% cotton, 28% nylon and 15% polyester. It’s so much fun to crochet with this yarn and great for beginners. Didn’t get your shaping quite right? Capri Cotton yarn is forgiving because its stretchy. They have a great range of colours.
If you need to use a substitute yarn, try to stick with a worsted/medium/4 cotton yarn and check the gauge. If your substitute yarn does not have stretch to it like the Capri Cotton yarn, you may have to go up a size and go for a looser crochet tank look which would still look amazing.
DESCRIPTION FOR COTTESLOE BEACH WAVES CROCHET CROP TOP
The Cottesloe Beach Waves Crochet Crop Top is a sleeveless fitted top that is great for summer. There are a number of crochet stitch patterns that give it an airy feel and a “string crochet” look. The neckline is V shaped and the straps are thin. It is an easy design for beginners and the length is customizable. This is a free and easy crochet pattern available in a range of sizes.
CROCHET MEASUREMENTS & SIZES
The pattern follows the following sizing guide: XS (S, M , L, XL, 2XL, 3XL, 4XL, 5XL). For example: ch 90(100, 110, 120, 130, 140, 150, 160, 170) means ch 90 for XS, ch 100 for Small, ch 110 for Medium, ch 120 for Large and ch 130 for XL and ch 140 for 2XL and ch 150 for 3XL, 160 for 4XL and 170 for 5XL.
To fit bust approximately: 28-30 (32-34, 36-38, 40-42, 44-46, 48-50, 52-54, 56-58, 60-62) inches or 71-76 (81-86, 91-96, 102-107, 112-117, 122-127, 132-137, 142-147, 152-158) centimetres.
Finished back width approximately: 13.5 (15.5, 17.5, 19.5, 21.5, 23.5, 25.5, 27.5, 29.5) inches or 34 (39, 44, 50, 55, 60, 65, 70, 75) centimetres.
Note: Designed as a very close fit with negative ease and a significantly cropped length.
CROCHET GAUGE
Approximately 14 stitches and 12 rows of half double crochet stitch in 4″ x 4″ (10 cm x 10 cm)
CROCHET MATERIALS
This section contains product affiliate links. We may receive a small commission (at no extra cost to you) if you make a purchase after clicking on one of these links.
We only recommend products that we love and that we use.
Yarn brand: Capri Cotton by Loops & Threads. Weight 4/Worsted/Medium. 100g per skein and 174 yards (or 160 metres). Approximately 2 (2, 2, 2, 2, 2, 3, 3, 3). Color used is White.
Substitute with any 4/Worsted/Medium yarn however check gauge. If you are not using a yarn with a stretch you may want to crochet up a size for a looser tank style.
4.5 mm crochet hook (US size 7). We use many different crochet hooks and some of them can get quite pricey – but if you are a beginner and looking for some great budget friendly ergonomic crochet hooks try these from Amazon. It comes in a set and the grip and shape is amazing for beginner crocheters. We love these and recommend them to all our beginner crochet friends.
Measuring Tape. We use a super budget friendly measuring tape. Make sure it has cm and inches (not all patterns are written with both). We are always crocheting on the go so we like our tapes small and compact and we put one in our design area, one in our bag and one in our car. Retractable works best! We use these super cheap mini measuring tapes from Amazon.
Stitch Markers. We use these locking crochet stitch markers from Amazon and these stitch markers that do not lock. They are cheap and colourful.
Blocking Pins. You should buy more pins than you think you need. If you are going to take the time to block don’t skimp on the pins. We like T shaped stainless steel pins that don’t rust when they get wet. We love these blocking T pins from Amazon and the tin means the pins don’t fall out on the floor.
Yarn Needle. Buy blunt needles with large eyes for yarn. We use these Yarn Needles because we like the convenient bottle, they are budget friendly and we get lots of them!
Scissors. We love these thread snippers because they are cheap, we get two of them AND they come with a case (some don’t). Don’t carry these without the case! After you use thread snippers you won’t want to snip with scissors.
CROCHET STITCHES & ABBREVIATIONS
ch = chain
sc = single crochet
hdc = half double crochet
dc = double crochet
tc = triple crochet (yarn over twice over the hook, insert hook into the st and pull up a loop. You should have 4 loops on the hook. Yarn over and pull through two loops, yarn over and pull through two loops, yarn over and pull through the remaining two loops).
BLO = back loop only
ch-sp = chain space (eg. crochet into the space and not the stitch)
sctog = sc 2 stitches together
tch = turning chain
sl st = slip stitch
st = stitch
sk = skip stitch
* = repeat the instructions following the * as directed
Note unless stated otherwise turning chains do not count as a stitch if there are 1 or 2 chains and the turning chain does count as a stitch if there are 3 or 4 chains.
SUMMARY of CONSTRUCTION
The Cottesloe Beach Waves Crochet Crop Top is made by first crocheting a bandeau body panel. We will crochet in the joined turning round and will use three different stitches – mesh stitch, triple crochet stitch, and the single crochet stitch. After we have crocheted the bandeau panel we will crochet the V neckline, finished by the straps. We will add on a crocheted fan border at the bottom of the garment.
Optional customizations will allow for a longer top with a less cropped style.
Yarn requirements may change if adjusting the length.
PATTERN INSTRUCTIONS for The Cottesloe Beach Waves Crochet Crop Top
Main Panel – Bandeau
ch 92 (108, 120, 136, 148, 164, 176, 192, 204)
sl st to join the end of the chain to the start of the chain.
Tip: Make sure your chain is not twisted when you join the chain.
Row 1: ch2, hdc around, sl st to join at the top of the tch. Turn
Tip: If you are new to crocheting in the round, it may be helpful to count the number of stitches for the first few rounds and every now and then to ensure your total stitches in the row stays consistent. For this main bandeau panel, there will not be any shaping so you should always be crocheting 92 (108, 120, 136, 148, 164, 176, 192, 204) stitches.
Tip: Whenever you crochet in the round, you may like to put a stitch marker at the top of the turning chain to help mark the spot where you need to slip stitch into. It also helps to remind you where the start of the round is.
Row 2: ch 4, sk next st, *1dc in next st, ch1, sk next st, rep from * until you reach the last st, ch1, sk st and sl st to join at top of the tch. Turn.
Row 3: ch2, *hdc into ch-sp, hdc in next st, rep from * to end with hdc into the last ch-sp, sl st to join at the top of the tch. Turn.
Row 4: repeat row 2
Row 5: repeat row 3
Row 6: repeat row 2
Row 7: repeat row 3
Row 8: ch4, tc in 2nd st, tc across until the last st, sl st to join at the top of the tch. Turn
tc = triple crochet (yarn over twice over the hook, insert hook into the st and pull up a loop. You should have 4 loops on the hook. Yarn over and pull through two loops, yarn over and pull through two loops, yarn over and pull through the remaining two loops).
Row 9: ch1, sc around. sl st to join at the start of the tch. Turn.
Row 10: repeat row 9 (the sc row)
Row 11: repeat row 8 (the tc row)
Row 12: repeat row 9 (the sc row)
Row 13: repeat row 9 (the sc row)
Row 14: repeat 8 (the tc row)
Customizing the Length: Continue repeating row 2 to row 14 until you reach the desired length. To determine, try the bandeau on by pulling it up under your armpits to see how many more rows you need to crochet for the desired length. Keep in mind that we will be adding a fanned hem at the bottom that will add another 1 inch to the length.
Make sure you end on a hdc row (row 3) or a sc row (row 9).
Fasten off.
Fan Pattern at the Base of Top.
Attach a yarn at the bottom of your bandeau at the start of the round (at the turning chain).
Row1: ch1, sc into 1st st, sc in all stitches around the base evenly. Make sure you chain a multiple of 4.
Row 2: ch 1, sc into first st. *ch5, sk3, sc into next st, rep * until end making sure the last ch5 ends with a sl st into the top of the tch instead of a sc.
Row 3: ch3, sc into first ch-5 sp, *7dc into next ch-5 sp, 3sc into next ch-5 sp, rep* until the end. sl st to join at the top of the tch.
Fasten off.
Measuring the V Neck
We will now crochet the front part of the top that includes the V neck design and straps.
Fold the bandeau so that the start of the round (the rows with all the turning chains) is on the right edge of your top and the fan pattern is at the bottom. You will now be placing three stitch markers on the top as follows:
Place the first stitch marker on the very right edge of your top (at the start of the turning chain row).
Place the second stitch marker, in the centre of your top (use a measuring tape to determine the centre of your top).
Place the third stitch marker on the very left edge of your top.
You will be crocheting two “triangles”. The first triangle (right triangle) will be crocheted between the first and second stitch marker and the second triangle (left triangle) will be crocheted between the second and third stitch marker. Let’s start with the first triangle on the right.
V Neck Right Side and Right Strap
Attach a yarn to the stitch with the first stitch marker (the right side of your top).
Row 1: ch 1, sc into each st until you reach the second stitch marker (the centre of your top). Turn.
Row 2: ch 1, sc2tog, sc into each st until you reach the second last st in the row, sc2tog. Turn.
(For Row 2, you are working back towards the first stitch marker and reducing the number of stitches in the row by 2 due to the sc2tog stitch)
Row 3: repeat row 1
Row 4: repeat row 2
Continue to repeat row 1 and row 2 until you have 3 stitches left in the row. If you have 4 stitches in a row, then crochet only ONE sc2tog to bring it to 3 stitches in the row.
Do not fasten off. You will now crochet the right strap.
Row 1: ch 1, sc into each st until the end (3 stitches). Turn
Repeat row 1 until the strap is long enough to reach over your shoulder and be seamed to the back right side of your top.
Fasten off.
V Neck Left Side and Left Strap
Attach a yarn to the third stitch marker (the left side of your top).
Row 1: ch 1, sc into each st until you reach the second stitch marker (the centre of your top). Turn.
Row 2: ch 1, sc2tog, sc into each st until you reach the second last st in the row, sc2tog. Turn.
(For Row 2, you are working back towards the third stitch marker and reducing the number of stitches in the row by 2 due to the sc2tog stitch)
Row 3: repeat row 1
Row 4: repeat row 2
Continue to repeat row 1 and row 2 until you have 3 stitches left in the row. If you get to 4 stitches in a row, then crochet only ONE sc2tog to bring it to 3 stitches in the row.
Do not fasten off. You will now crochet the left strap.
Row 1: ch 1, sc into each st until the end (3 stitches). Turn
Repeat row 1 until the strap is long enough to reach over your shoulder and be seamed to the back left side of your top.
Fasten off.
CROCHET ASSEMBLY AND FINISHING
Try your top on. Using stitch markers, attach the two straps to the back side of your top. Using a yarn needle and identical yarn, sew the two straps to the inside back of the top.
Weave in all your ends.
Congratulations you have finished your The Cottesloe Beach Waves Crochet Crop Top. I hope you enjoyed this free crochet pattern.
It would be amazing to see a photo of your completed work on instagram. Tag us @kiksandjackcrochet.